Catalina - Capri - 25s International Assocaition Logo(2006)  
Assn Members Area · Join
Association Forum
Association Forum
Home | Profile | Register | Active Topics | Forum Users | Search | FAQ
 All Forums
 Catalina/Capri 25/250 Sailor's Forums
 Catalina 25 Specific Forum
 Blisters - What process to remedy?

Note: You must be registered in order to post a reply.
To register, click here. Registration is FREE!

Screensize:
UserName:
Password:
Format Mode:
Format: BoldItalicizedUnderlineStrikethrough Align LeftCenteredAlign Right Horizontal Rule Insert HyperlinkInsert EmailInsert Image Insert CodeInsert QuoteInsert List
   
Message:

* HTML is OFF
* Forum Code is ON
Smilies
Smile [:)] Big Smile [:D] Cool [8D] Blush [:I]
Tongue [:P] Evil [):] Wink [;)] Clown [:o)]
Black Eye [B)] Eight Ball [8] Frown [:(] Shy [8)]
Shocked [:0] Angry [:(!] Dead [xx(] Sleepy [|)]
Kisses [:X] Approve [^] Disapprove [V] Question [?]

 
Check here to subscribe to this topic.
   

T O P I C    R E V I E W
jon300c Posted - 06/22/2018 : 10:59:28
Hi,

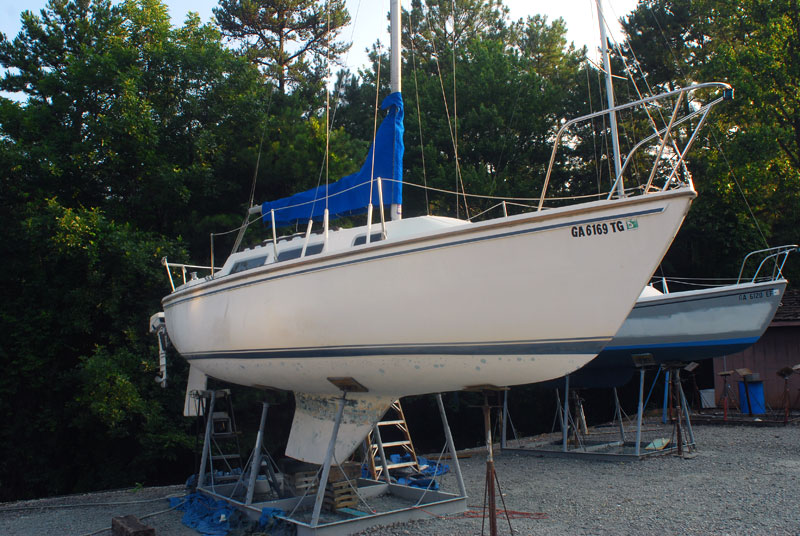
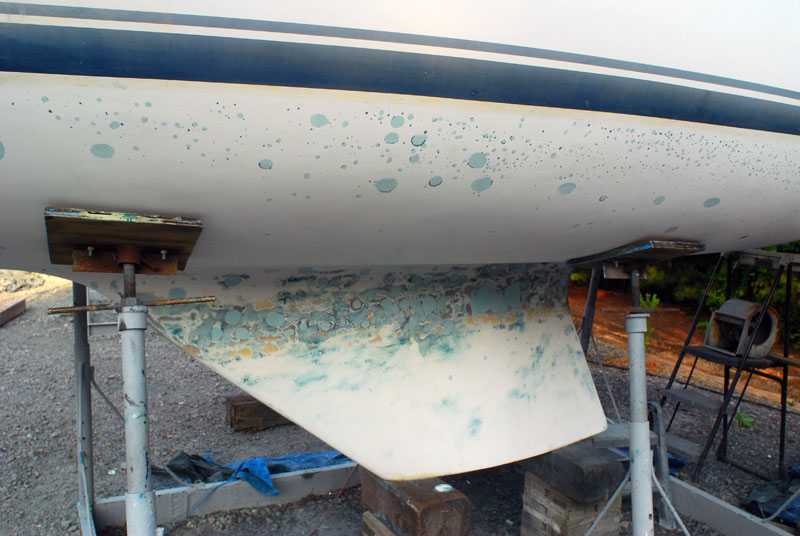
I am about to start the process of remedying my 1978 Catalina 25 blister problem. When I picked up the boat I had the bottom sandblasted as the boat was sitting in fresh water for 5+ years. After the sandblasting was done it revealed I would say several hundred blisters some tiny but some the size of a silver dollar. My question is would it be worth it to get a power marine shaver to take off all of the gelcoat or take the time to pop and grind down? Has anyone gone through this process and make a recommendation?

Thank you

Jon
15   L A T E S T    R E P L I E S    (Newest First)
jmstee Posted - 10/25/2019 : 11:51:53
I hauled my boat and started sanding the bottom and there appear to be thousands of tiny blisters. I ground a few of the bigger ones out (¼ in or so) and they don't seem to go past the gelcoat. About 24 hours after being hauled there is only a speck of water in these if anything. I did some keep repair last year and filled some large blisters but this on the hull seems ridiculous. Is it even worth fixing? would you just leave it alone for the winter letting it dry then barrier coat over it and hope for the best. I haven't looked into it but stripping all the gelcoat doesn't sound affordable or worth it on a boat this old
redeye Posted - 09/13/2018 : 11:06:12
Never seen a completely delaminated boat, must be rare.

I had my bottom done professionally and they dug out and filled the blisters bigger than a dime. Lots of little ones that have stayed the same for the last 10 years.


Didn't cost much more than the regular bottom job.


HerdOfTurtles Posted - 09/12/2018 : 12:53:25
Story time.

The bottom of my boat completely delaminated when it was pressure washed to clean it up for a bottom job. This, apparently, is what will eventually happen if you do not address the blisters and you do not dry the boat and apply an epoxy barrier.
The cost to repair was approximately $4500 to apply epoxy barrier, epoxy fairing the entire hull, and applying bottom paint. So in my case, basically the cost of the boat when I bought it. A couple months later and there's already some spots where the cast iron keel is showing rust through the bottom paint...

jon300c Posted - 09/11/2018 : 13:52:49
Hi All,

As with most things in life I was delayed in starting the repairs. This weekend I was able to grind out some of the blister areas and hope to have that phase completed this upcoming weekend. A few of the areas I had to go about 3/16 of an inch to get to solid fiberglass as it just kept wanting to flake off.

Interesting thing... I called 2 of the primary epoxy companies and one said to use epoxy with 17oz mat layering largest to smallest. The other company said using a fairing compound would be just fine.

I think I am leaning towards the epoxy and mat for the deeper crevices and using fairing compound for the rest.

I do have a lot of little "pockets" in the hull that are about about 1/16 to 1/8 inch in size that not sure what to do with. Should I just epoxy the hull after I do all the repairs and not worry about those?

Once I figure out how to get pictures in my posts I will add them.

Jon Savage
Leon Sisson Posted - 06/26/2018 : 09:20:18
Larry,

That's an impressive repair task on Robin's Nest. Mine at its worst looked similar to your first few photos with the blue bottom paint still on. The laminate damage on mine doesn't seem to have spread further than a palm print from the deepest blisters.

Good point about the drying time after opening, before resealing blisters. I forgot to mention that in my procedure summary above. (I worked so slow, the drying time was build into my pace of completion.)

I recommend breaking open as many blisters as you can find while they're still swollen, right after the boat has been pressure washed. Or at least block sand the paint off the peaks with course wet sandpaper so you can find them later if they shrink.

Regarding the question of "can't I just ignore my hull blisters and go sailing?" Larry did a great job of showing and explaining how that might turn out, and why you might want to do the work yourself. Thinking about how trapped water freezing pries boats apart makes me shiver even here in the tropics. I suggest those of you in the frozen north bring your boats south for the winter.

As Jon mentioned, even the most unpleasant boat work is still valuable experience. I know I don't have to point this out to folks here, but don't be that idealistic but clueless first time boat buyer who blows their entire boat budget on the largest (oldest, most neglected and dilapidated) boat they can find among the nearly expired postings on Craig's List.
Start small, and don't skip rungs on the learning ladder on your way to whatever size boat you aspire to end up with.


And as I've mentioned before, read Don Casey's books on classic fiberglass sailboat repair. When others occasionally comment on how thorough some of my procedure descriptions seem, frequently I'm just thoroughly paraphrasing Don Casey, but without his excellent illustrations.

-- Leon Sisson
OLarryR Posted - 06/26/2018 : 09:12:38
It would have been a shame to scrap such a fine boat. These boats are worth so much more to us that sail them, work on them to enhance them, enjoy them as much for recreation and sport as a hobby as well and given the proper care, they will last a real long time. To me, it was worth the effort and time has proven that to be the case.

It may turn out that you have mostly easy to square away blisters and so as long as you are willing to undertake the initial stage(s) of repair, you can then assess how things are going.

Last year, I replaced all the upholstery and outside cushions and before that, years ago, replaced the standing rigging. I have made numerous repairs which mostly turned out to be improvements. I have gotten so much out of owning this boat and most have had same experiences. It is not so much the cost of all of these things but what you can afford or get away with and still smile when you go sailing or just relaxing onboard. The boat is worth so much more to the owner than the original cost and maintenance costs. It really comes down to how much enjoyment and how frequent that is that you get out of the boat versus the cost put in. No one knows that better than us owners.

Enjoy ! Even as you undertake repairs !
jon300c Posted - 06/26/2018 : 07:24:20
Hi,

I appreciate all the great feedback and suggestions. I am under no allusions that this might be an "easy" job. I got the boat for free knowing it had a lot of work needing to be done. I am wanting to do this myself to learn as eventually I want to buy a bigger boat and go offshore. If the boat repairs do turn out to be too much then off to the scrap yard it goes. I am also part of an active sailing club and we have 20+ boats in our boatshare program and they are often needing repairs so I do get to practice on them. My goal is to start the major repairs on our boat in the next couple of weeks and document the whole process.

I subscribe to several YouTube sailing channels that have been a tremendous asset in learning about boat repairs.

WOW... what a Job you had done on your CAT, $7K WOW!

Jon

Voyager Posted - 06/26/2018 : 03:52:58
Here’s the link to Sail Life on YouTube. I’d recommend becoming a subscriber to this series. You can learn a lot!
Voyager Posted - 06/26/2018 : 03:48:11
Wow Larry, I looked at your website photos and that condition verges on total delamination due to blistering. While not the worst case ever, it’s pretty close.
Not to second guess, but I recently watched a YouTube guy named Mads from Denmark (see Sail Life) use a gelcoat shaver to remove the bottom skin from his hull. That was Jon300c’s original question.
He ground down about half of a 38 foot boat in a few days.
Following that was the job ahead to lay up new glass for his bottom and barrier coat and bottom paint. Seems like doing it all at once might be less costly than patching individual blisters.
But things always look easier and go faster with the magic of television.
OLarryR Posted - 06/26/2018 : 03:26:36
I had a blister job accomplished by a private yard since I had quarter size blisters and thru the years, these increased significantly. The story with blisters is that in many cases, they are only cosmetic issues with blisters only penetrating the paint (paint blisters) or just barely going thru the gelcoat. These type blisters, depending on the extent, either nothing needs to be done or minor efforts with grounding them out and epoxying the spots that penetrate thru the gel coat. Less common on Cat 25s are where the blisters go thru the gelcoat and into the laminate. These type blisters are much more a concern since they spread out under the laminate, can be deemed structural deficiencies, and at first, grinding out the blisters uncovers blisters on top of blisters and then blisters adjacent to the original blisters also penetrating the laminate. Unfortunately, this latter type of blisters is what I had on my Cat25. The story with blisters that penetrate the laminate is that sometimes as you start grinding out the initial blisters, you then realize that the extent of blisters is much more seve4re. Also, I can tell you from personal experience, that those in the business have a much better trained eye and feel as to the extent of the blisters. Areas that I thought were initially okay, they then grinded and grinded away and sure enough there was addl seepage of water and apparently addl blisters that needed attention. Having a yard do the work has it's benefits but the cost creeps up as more and more blisters are found. The apparent concern with only taking care of some of the blisters or the ones that most non-professionals spot are that those blisters not addressed have water within them. Then if you live in an area that freezes during the winter months, it is those blisters that expand as the water within them expands upon freezing. So, these then become future work after you thought you were done.

If your blisters are mostly cosmetic and you can take care of it yourself with few that need real grinding out, addl work, then you will save an obsence amount of dough doing it yourself. My experience having checked in the area, on the web, as to how much a blister job can cost repaired professionally, can creep up to $5000 - $8000 by the time it is all done and 7 coats of Interlux Interprotect and 1-2 coats of anti-fouling paint are eventually applied. In my case, what originally was thought to be a not too severe problem wound up having 1/3 of the hull bottom or more grinded away with 2 foot blister areas grinded out in may areas and the full job wound up costing ~ $7000. I had a feeling the cost may be that much since I had read about two others on the Potomac River, further south, that had their yards do similar repair jobs and they also cost in the same ballpark.
This was in 2011-2012, 6+ years ago. The hull was appropriately contoured after they applied laminate and resin for all repaired areas and I have had no re-occurrence except for the normal small and few paint blisters which you can flatten with your finger nail, sand away when re-applying anti-fouling paint.

If you go to my website, I have detailed photos of the entire job from start to finish. By the why, ideally, when uncovering the blisters and having them opened, the areas need to drain over a couple of months or so, to ensure all water drains out, before the repairs are undertaken. I should indicate, you may suffer periods of anxiety and nightmares if you view the blister photos on my website - Not for the faint hearted.

I should also mention for those with bad and many blisters and not going to do the work themselves but by a yard, you will probably have to decide whether to go forward with an expensive job approaching the cost of the boat or let it go and sell/scrap the boat. I decided to bite the bullet and have the job done. I am very glad I did ! I sail about 50 times a year and therefore have made much use of my boat since the work was accomplished. The hull bottom these days is probably superior to a new hull considering I have 7 layers of Interlux Interprotect on the bottom to prevent a repeat of this event.

Here is the direct link to the blister and repair photos on my website. You click on the photos to expand them to normal size:
http://catalina25.homestead.com/BlisterRepairWaterproofing.html
jon300c Posted - 06/25/2018 : 13:54:27
So,

Went and spent some more time looking at bottom of boat this weekend. The blister situation is not as bad as I had originally thought. I will pop and grind starting this weekend.

On a side note, took 27' power boat to dump this morning and I now have a nice trailer for my Catalina. So stoked, meeting with welder this evening to do measurements for some changes I need to make to it to fit the sailboat. Sure glad I have club trailer I can compare it against.

Jon
bigelowp Posted - 06/22/2018 : 20:05:32
Leon's approach is the best and most reasonable (as well as most succinctly written primer on the topic) way to resolve blister problems. That said, I have to ask,on boats the ages of ours, what if you do nothing and just enjoy sailing the boat with whatever blisters it may have? At what point is the vanity of having a perfect hull not worth the effort -- or -- at what point do the blasts become structural/safety issues?
Voyager Posted - 06/22/2018 : 17:41:56
Whoa Leon,
That’s a complete tutorial in doing a completely thorough job. I too had small blisters on Passage as I was docked in brackish water. I did not take such drastic measures. But if I had quarter-size or larger blisters I probably would have. In my case the small blisters dried over the winter and I went with 6-8 layers of barrier coat.
For Jon, if you’re willing to restore your bottom then go with the pop, grind and patch method as described by Leon, or grind off the gelcoat uniformly below waterline with the heavy equipment.
If you plan to keep the boat, it pays off in preventing aggravation every year when you repaint the bottom.
Leon Sisson Posted - 06/22/2018 : 14:28:26
When I got my 1979 Catalina 25 (back in the 1990s), under its expired bottom paint and multi-generation accumulation of barnacles, I found a botched barrier coat over top of some very poorly done fiberglass repairs and lots of blisters ranging from pea size in gelcoat only, up to palm size extending into the outer most layer of woven roving. (A couple of the worst ones extended half way through the thickness of the hull.)

I removed all that, ground out the blisters down to solid laminate, repaired, refaired, and reapplied barrier coat, followed by several coats of ablative copolymer bottom paint. (At the same time, I also removed and refurbished the swing keel, installed all new thru-hulls, and repaired some disappointing fiberglass layup from previous repairs and even the factory, but that's a whole 'nother topic.)

More specifically, I ground out the blisters using (depending upon size) a Dremel, a drum or disk sander chucked in a 3/8" variable speed drill motor, and a 5" right angle grinder. By "down to solid laminate" I mean dark uniform color, not looking aerated or resin-starved as a result of osmosis and other chemical processes having removed some of the polyester laminating resin.

Any divots large enough to accept fiberglass cloth were filled with successive layers and epoxy resin, starting with largest diameter patch, and working down to smaller ones as the remaining void filled in from the edges, and became more shallow. I found that with planning and preparation, I could continuously pile on a handful of layers without waiting for them to cure. (In hot weather, working on several blister areas simultaneously, earlier laminations were curing almost as fast as new ones were added.) Every few layers, patches were let cure firm (i.e. overnight), then high spots were sanded off level with surrounding hull surface to check progress and identify remaining low spots. Felt tip markers came in handy for marking high and low spots.

I repaired smaller pits using epoxy-based fairing putty. I now recommend against that. Stick with epoxy resin and fiberglass when replacing resin and fiberglass. Rather than WEST System fairing additives and "Micor-Fiber" reinforcement (which I think is cotton), use milled fiberglass, which is similar to fiberglass sanding dust without the resin, i.e. nearly microscopic glass rods a few thousandths of an inch long. Don't breathe it!

Once the former blisters and other repairs were 'glass filled to about level with the hull surface, I faired the entire hull using epoxy-based fairing putty. I recommend using epoxy resin thickened with glass micro-balloons, and maybe the slightest amount of colloidal silica to prevent sags and runs. To grossly over generalize, almost any additive which makes the epoxy filler spread smoother and easier to sand will also leave it more prone to future blisters.

To avoid leaving flat facets on the hull, I did final fairing using sandpaper glued to longboards. By "longboards" I mean sanding blocks made from thin plywood which match the size of cut up sanding sheets. A small board would be 1 or 2 sheets x 1/3 sheet, cut the long way. A longer board would be 3 sheets x 1/3 or 1/2 sheet, maybe cut the wide way. For handles, I used epoxy to glue large round wooden drawer pulls near the ends of the boards. To attach the sand paper, I used peelable contact cement sold specifically for sandpaper. (Changing paper was still kind of a messy task.) By thoroughly saturating and coating the longboards with epoxy in advance, I could use harsh scrapers and solvents to clean them during sandpaper changes. In selecting and making your sanding boards, keep in mind the goal is for them to easily flex to match the curvature of the hull where they're being used. (Hence different sizes and different stiffness.)

For the barrier coat, I used WEST epoxy with their recommended barrier coat additive. Seeing as how that was quite a while ago, I suggest you research which barrier coats are currently in vogue. (A word of caution -- none of them are magic.)

I applied the epoxy barrier coat using the roll-and-tip method, thin foam roller cover to spread the goo, then lightly dragged with a cheap paintbrush (or cut up roller cover jammed in slotted PVC pipe handle) to encourage it to self-level before curing. When sanding the cured barrier coat, I had to find some compromise between getting it immaculately fair, and still leaving some barrier coat on the hull. I applied several coats. When working with large batches of epoxy, I found it helped to 'float' the paint roller tray in a cardboard beer flat or similar shallow container, lined with sheet plastic, containing a bath of ice water. Keep in mind, when a batch is starting to kick prematurely in the roller tray, you're better off throwing it away then, as opposed to sanding a lumpy mess off the boat later.

When applying the ablative bottom paint, I started with an indicator coat of a contrasting color, then built up several coats of the desired final color. This helps determine when the boat is about due for another bottom job, without waiting for an indicator coat of barnacles to form.

This is probably getting kinda long, so I'll stop here.

-- Leon Sisson
Erik Cornelison Posted - 06/22/2018 : 12:08:02
I'd get the quotes to fix it from different sources, then decide if its worth it. Or are you the type who wants to do it your self?

I wouldn't spend too much as these boats are only worth so much.

Association Forum © since 1999 Catalina Capri 25s International Association Go To Top Of Page
Powered By: Snitz Forums 2000 Version 3.4.06
Notice: The advice given on this site is based upon individual or quoted experience, yours may differ.
The Officers, Staff and members of this site only provide information based upon the concept that anyone utilizing this information does so at their own risk and holds harmless all contributors to this site.