Catalina - Capri - 25s International Assocaition Logo(2006)  
Assn Members Area · Join
Association Forum
Association Forum
Home | Profile | Register | Active Topics | Forum Users | Search | FAQ
Username:
Password:
Save Password
Forgot your Password?

 All Forums
 Catalina/Capri 25/250 Sailor's Forums
 Catalina 25 Specific Forum
 My version of the A-frame
 New Topic  Topic Locked
 Printer Friendly
Author Previous Topic Topic Next Topic  

JimGo
Admiral

Member Avatar

USA
962 Posts

Initially Posted - 11/06/2011 :  20:58:09  Show Profile
After obsessing over the A-frame design for a few weeks, I finally had to bite the bullet and build it because the marina said my mast had to be lowered, and I am too "frugal" to pay them $150 to drop the mast. So, I built an A-frame myself. The parts I used were:

qty 2 - 10' x 1" EMT conduit (be sure to look in the electrical section)
qty 2 - 4" x 1" galvanized pipe nipple
qty 4 - 5/16" x 2" carriage bolts
qty 4 - 5/16" flat washers
qty 3* - 5/16" nuts
qty 2 - 5/16" nylon washers
qty 1 - eye bolt (2.5" long, will update with thickness)
qty 4 - washers for eye bolt
qty 1* - nut for eye bolt

All of the above were purchased at Home Depot, and are standard, in-stock items. Be sure to look in the electrical section for the conduit - there is other pipe in the plumbing section, but it's much heavier. Also, notice the * on the number of nuts - I dropped one overboard. Fortunately, I had some spares. I'd STRONGLY recommend buying 6-8 of them, just in case.

I also purchased [url="http://www.harborfreight.com/3-8-eighth-inch-x-100-ft-diamond-braid-rope-92463.html"]100' of 3/8" rope[/URL] and [url="http://www.harborfreight.com/4000-lb-capacity-lifting-block-96013.html"]a heavy duty block[/url] from Harbor Freight Tools. 50' of rope would have been sufficient, but I didn't think about it at the time.

If I recall correctly, the conduit was about $10 per piece, and the pipe nipples were about $5 each. The other hardware for the A-frame itself probably totaled another $15, and the block and rope were another $15, so all told I think I was in the $50-$60 range for the total cost.

Once the parts were purchased, I proceeded to "manufacture" the A-frame. The first part of the manufacturing process was the flattening of one side of the pipe nipple.

Here's the nipple:

and here's a before and after shot of the flattened ends:


I'm not sure this was 100% necessary, but it did give me a good surface against which to mate the nipple and the chainplate, so I'd do it again. To flatten the nipple, I used a sledge hammer and simply rested it on a cut portion of a tree (a tree stump would have worked, too, as would any other sacrificial surface).


If you try the same thing, I have a few words of caution:
1) galvanized steel is hard, so expect it to take a few whacks;
2) be sure to hammer on the seam so you don't put the seam at the "thin" part and possibly cause the part to break;
3) wear safety goggles;
4) properly secure the nipple to the surface;
5) wear gloves, just in case the securing method fails, so you don't wind up having the threads fly up and smash into your finger, creating an interesting array of evenly-spaced slices along your knuckle.


If you decide to flatten both sides of the nipple, be sure the flattened ends are offset by 90 degrees. The chainplates run perpendicular to the length of the boat (i.e., athwartship), and as you can see in the picture down below where I've attached the nipple to the chainplate, the bolts that connect the nipple to the chainplate, and the nipple to the conduit, will be at 90 degrees.

Once at least one side of both nipples have been flattened, you can also flatten BOTH ends of BOTH pieces of conduit. When I did it, I made it so the flat ends were co-planar. That is, unlike DaveyJ's, the flat parts were in line with each other, rather than rotated by 90 degrees. This wasn't a big deal, but it did create a bit of a problem (which I'll describe later). The problem was easily overcome, but had I offset them like DaveyJ, I probably would have made things a little easier. I flattened 4-6" of each end of the conduit. I wasn't particularly picky about measuring. The goal here is just to create flat surfaces so that, for the parts that rotate against the nipple, you have a smooth, even bearing surface. If both surfaces are left round, from other projects I've found that you get weird "jerking" movements as the parts move around each other. So, at least one surface should be flat, IMHO.

Next came drilling holes. I have mostly brad-point bits because I do a lot of woodworking. Brad points are a BIG mistake with metal. As a result, I couldn't use my 5/16" bit, and had to go larger because of what I had available. The additional "slop" wasn't a problem. Be sure to drill slowly and carefully. I used a drill press, and drilling through the galvanized nipple was slow going. Drilling through the conduit was MUCH easier.


As you can see, I drilled the holes in the nipples so they were close to the back of the threads. I also drilled the two sets of holes so they were offset by 90 degrees, that's why you can't see the "other" set of holes in either of the nipples.

That was all it took - several strong "whacks" and eight holes, and I had all the makings of an A-frame. Next came the assembly, which happened at the dock.

When I brought everything to the dock and onto the boat, I first connected the "forward" ends of the conduit (these ends were really just selected at random) together using the eye bolt. The eye bolt had a washer between the "eye" and the conduit, two more washers between the conduit pieces, and another on the opposite end before the nut was attached. As discussed above, since I had the flat parts of my conduit co-planer, the eye bolt sat to the side, rather than on top of the A-frame. This wasn't a problem. However, when I went to spread the "legs" of the A-frame so they could go over near the chainplates, the whole thing wanted to rotate. We took the conduit off the boat, slipped the eye bolt between the boards of the dock to keep it from rotating, then carefully lifted one piece of conduit to bend the end. We flipped the whole thing over, slipped the other end of the eye bolt between the boards, and repeated. When we put the newly bent A-frame back on the boat, it fit great.

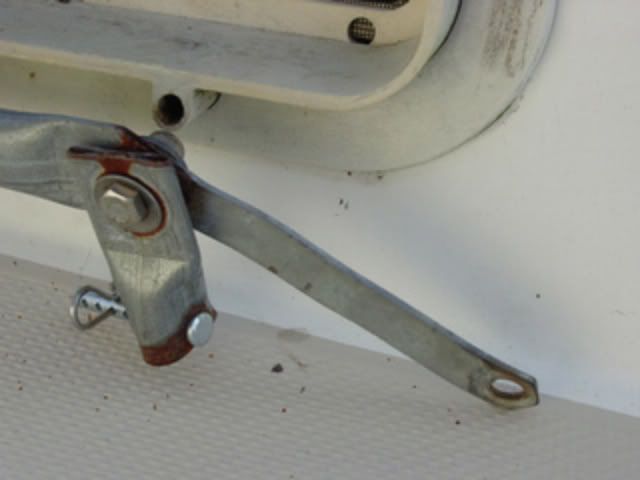
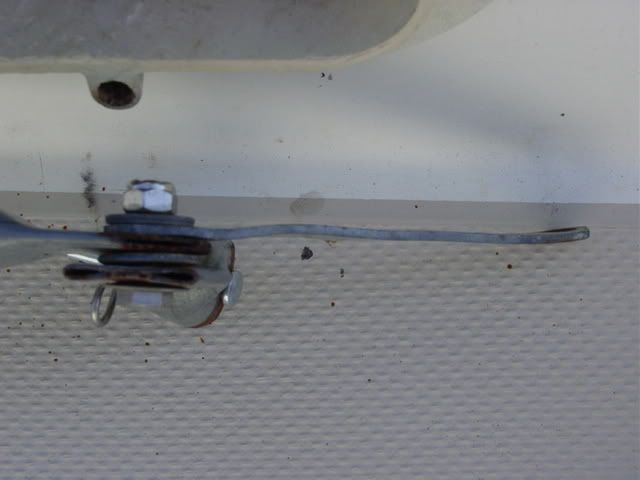
The next thing I noticed was that 10' conduit was too long for the conduit to attach to the forward chainplates. It turned out, however, that this wasn't a bad thing. The second set of chainplates on my boat have two holes, so I was able to easily attach the pipe nipples to that chainplate, as you can see in this picture:


You'll note that the nipple doesn't sit over the chainplate, although I flattened it, in part, for that purpose. It may have fit over the forward chainplate, but the second chain plate was too wide, so there was no way it would fit. Instead, I just butted the nipple against the chainplate. If I were doing it again, I would probably cut the conduit down a bit so I could use the forward chainplate (since you have to release the forward lower shrouds anyway), although the 10' conduit did give a lot of leverage.

It looks like something the previous owner installed, but there's a large cleat on my bow that was perfect for attaching the block. The clip on the block's snap had some trouble fitting over the cleat, but otherwise it was an easy install.


The rope was passed through the block, then tied in between the washers that separated the conduit pieces. The other end of the line was run back to the cockpit using existing deck hardware, tripple-wrapped around the winch, then cleated off. The forward stay was then moved to the eye of the eye bolt, and the forward shrouds (forward lower stays) were removed. I kept a good grip on the line and very slowly eased it out while GENTLY pulling on the rear stay, and the mast came down easily and in a very controled manner. I had someone on the cabintop helping to keep the mast stabilized; next time, I'll have tangs installed on the pipe nipples so I can keep the forward shrouds installed.

I need to build a crutch/stern support for the mast; I don't like it where it is. But, for now, it will have to do.


I'll try to update this with some other information for those coming after me, such how far from the edges the holes were drilled. What other information am I missing?

- Jim
Formerly of 1984 C25 named Dragon Wing

NOTE: In my case, PLEASE don't confuse stars/number of posts with actual knowledge. On any topic.

Edited by - JimGo on 11/06/2011 21:08:14

hewebb
Admiral

Members Avatar

USA
761 Posts

Response Posted - 11/07/2011 :  05:00:57  Show Profile
I am in the process of doing about the same thing and was wondering if the 1” electrical conduit was strong enough to use to step up the mast without bending. I have used if for some other projects and it seems to be stronger than it looks. I have a rolling furler and was planning to use the forestay to raise and lower the mast leaving the furler and sail in place.

Edited by - on
Go to Top of Page

JimGo
Admiral

Members Avatar

USA
962 Posts

Response Posted - 11/07/2011 :  05:37:00  Show Profile
I think there is more strain on the block than on the conduit. Most of the weight/ force of the mast is going to be transmitted via the forestay to the peak of the A-frame, and from there to the rope, and to the block/pulley. I am sure the conduit gets a portion of the weight, but I never saw it even flex and it seemed sufficiently strong. I figured if DaveyJ used it regularly, it should work for me, and it did.

Edited by - on
Go to Top of Page

Davy J
Master Marine Consultant

Members Avatar

USA
1511 Posts

Response Posted - 11/07/2011 :  05:43:37  Show Profile
My a-frame is connected to where the forward lowers are removed. The bottom connector "hinges" on my a-frame are just a short piece of the conduit. It is easier to bend and drill then the pipe nipple.


I used a vice to Flatten the pieces.

Edited by - on
Go to Top of Page

JimGo
Admiral

Members Avatar

USA
962 Posts

Response Posted - 11/07/2011 :  13:47:35  Show Profile
<blockquote id="quote"><font size="1" face="Verdana, Arial, Helvetica" id="quote">quote:<hr height="1" noshade id="quote"><i>Originally posted by Davy J</i>
<br />My a-frame is connected to where the forward lowers are removed. The bottom connector "hinges" on my a-frame are just a short piece of the conduit. It is easier to bend and drill then the pipe nipple.
....
I used a vice to Flatten the pieces.
<hr height="1" noshade id="quote"></font id="quote"></blockquote id="quote">

Yeah, I was thinking that if I had to do it over again, I would use the cut-off to take the place of the "nipple".

Edited by - on
Go to Top of Page

GaryB
Master Marine Consultant

Members Avatar

USA
4275 Posts

Response Posted - 11/07/2011 :  21:43:24  Show Profile
Jim,

Your A-Frame looks exactly like mine with the exception of the length. My pipe nipples slide right over the forward lower chainplate reducing some of the slopiness.

Edited by - on
Go to Top of Page

hewebb
Admiral

Members Avatar

USA
761 Posts

Response Posted - 11/08/2011 :  05:55:20  Show Profile
Thanks all.

I tend to over build when I make something. I will use the 1" electrical conduit. I was thinking of using 1" SS tube with 1/8 " wall and SS fittings. Guess that idea is a bit of overkill. I think I will use the 1" conduit for the stern rack as well.

Edited by - on
Go to Top of Page

KiteKraemer
Navigator

Members Avatar

191 Posts

Response Posted - 11/08/2011 :  12:20:10  Show Profile  Visit KiteKraemer's Homepage
JimGo &amp; Co.: I have a couple &apos;o questions for ya,

Why did your marina tell you that you needed to take your mast down? :(

What do you acheive with the aframe you built? I don&apos;t get what it&apos;s for.

When I winterize, I lay the mast on my rails like you have (for transport and storage),
and put a tarp over it. ?? What am i missing?

Edited by - on
Go to Top of Page

Davy J
Master Marine Consultant

Members Avatar

USA
1511 Posts

Response Posted - 11/08/2011 :  13:01:09  Show Profile
<blockquote id="quote"><font size="1" face="Verdana, Arial, Helvetica" id="quote">quote:<hr height="1" noshade id="quote">What do you acheive with the aframe you built? I don&apos;t get what it&apos;s for.<hr height="1" noshade id="quote"></font id="quote"></blockquote id="quote">

This should answer that question:
http://www.youtube.com/watch?v=r33VCObNroY

Edited by - on
Go to Top of Page

KiteKraemer
Navigator

Members Avatar

191 Posts

Response Posted - 11/08/2011 :  16:37:34  Show Profile  Visit KiteKraemer's Homepage
I was wondering about the all the galvanized piping?? That seems like a lot of work for something for a tarp to lay on. And why would the marina ask him to step it down?

I know what the a-frame is for at the stern; but that one seems overbuilt.
I have a 2x4 with gudgeon pins on one end that fits perfectly into my gudgon holes for the rudder, the other end is a "Y" shaped piece of steel.
The "stick" is 8&apos;. all I do additionally is tie it secure on the rear rail.

Essentially it does the same thing as the above pictured but at much less expense, weight, storage, etc.
I actually rarely use it when I step the mast down; cuz I always ask for help. I&apos;ll post a pic of it; but essentially it&apos;s as simple as described.]
There is a roller on the "Y" at the top of it.

Edited by - KiteKraemer on 11/08/2011 16:38:17
Go to Top of Page

JimGo
Admiral

Members Avatar

USA
962 Posts

Response Posted - 11/08/2011 :  17:35:19  Show Profile
KiteKraemer,
What you are describing is what I would call a "mast lift" or a mast support pole, and is different from an A-frame. Here&apos;s a picture that might help explain how it works.


The forestay is connected to the peak of the A-frame, as is a line which passes through a block and is then lead aft. As the mast drops, the forestay causes the A frame to lift up off the deck, which in turn raises the end of the line. Because the A-frame lifts the end of the line, it allows you to have more leverage over the "falling" mast, thus giving you better control over the mast. It also adds lateral stability, helping prevent the mast from swinging side-to-side.

Does that help?

Edited by - JimGo on 11/08/2011 19:20:18
Go to Top of Page

JimGo
Admiral

Members Avatar

USA
962 Posts

Response Posted - 11/08/2011 :  21:01:12  Show Profile
To your question about why the marina wanted it stepped, the owner said he had had problems with C25&apos;s in the past, and would prefer it stepped. He has been very kind to us, so I&apos;m happy to oblige.

Edited by - on
Go to Top of Page
  Previous Topic Topic Next Topic  
 New Topic  Topic Locked
 Printer Friendly
Jump To:
Association Forum © since 1999 Catalina Capri 25s International Association Go To Top Of Page
Powered By: Snitz Forums 2000 Version 3.4.06
Notice: The advice given on this site is based upon individual or quoted experience, yours may differ.
The Officers, Staff and members of this site only provide information based upon the concept that anyone utilizing this information does so at their own risk and holds harmless all contributors to this site.