Notice:
The advice given on this site is based upon individual or quoted experience, yours may differ.
The Officers, Staff and members of this site only provide information based upon the concept that anyone utilizing this information does so at their own risk and holds harmless all contributors to this site.
This weekend I started work on a DIY furling system out of what was laying about in my dad's garage.
A friend told me that there are other people who have built similar setups, so this week I'll be doing some research on the web to see if there's a better way of doing this. But, it did work with the tarp I cut to resemble a sail.
This weekend I started work on a DIY furling system out of what was laying about in my dad's garage.
Ambitious project, I love it! I figure, if you can make something that works then why pay someone else?
On another note.. I gutted the entire interior this evening, scrubbed and used mold killing products anywhere there was signs of any and just did a good old deep clean. Needed it and deserved it after 5 days of sailing in a row. Tomorrow... Make it six in a row. Whoo!
A week and a half ago we completed re-bedding everything we thought was leaking and then some, which amounted to about 80% of all the deck hardware. Hard rains moved through early this morning so I stopped by the dock on the way to work and discovered she was dry! Woohoo! The real leakers were both full length ginny tracks that were a bear to do - about 10hrs alone just for those. We'll complete the rest this winter and I sure don't want to do that again for a while, that's for sure.
What?! I don't think my body can get back into that quarter berth with my fingers bent at unnatural angles, holding my head up with one foot on the transom and the other on the keel winch assembly while screaming at the admiral to turn the screw the OTHER WAY who can't hear me because the neighbor decided to pick that exact time to mow his yard that one particular day of the month! This HAS to last me at least a few years!! lol
I replaced the winch strap and the bolt that secures the strap to the drum on my C-22 trailer. The original bolt was rusted and bent. Better to replace it now ($1.50 for a stainless bolt and nut at Ace hardware) than be sorry later. Interesting setup. There is a metal bar that goes through the loop on the winch end of the strap. The bolt goes through a hole on each side of the drum walls close enough to the drum that it catches and holds the bar thus securing the strap to the winch.
The Admiral found this handy dandy shelf at Menards! It has two c-clamp type screws. It fits nicely on either side of the dinette aft wall or on a hatch board. They are made for kids bunk beds.
We also found these plastic coffee cups. They are Coleman camping cups and hang one the rails perfectly. They also extend our storage area for small articles.
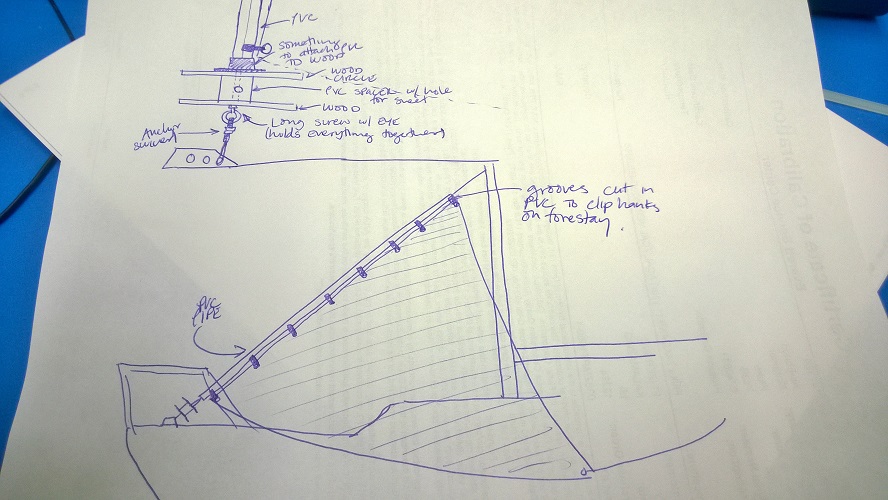
I added the larger fingers holes as I got the finger stuck in storage area cover. The larger cover in aft berth I cut inhalf then added large fingers hole. They seem to help vent those area.
Used one of my old pintles to make a new bigger stronger boom end tang. The old thin original was showing its age and I didn't want to be the guy in the Viagra comercial.
Prepped the remaining wood to give it all a sanding tomorrow before treating it. Hopefully have my crazy hatch boards finished Sunday to go back on as well. This coming week is going to be a busy one. The admiral is doing a trip with her girlfriends which leaves me free to get to all the things I've been meaning to. Gonna be a great week!
Everything got sanded smooth as silk and one coat of a nice pecan to give a little richness to the wood. Tomorrow, coats of spar varnish along with the new boards.
So I finished the weekend project. All the exterior wood has been refinished and my little vent unit for the boat is installed. I knew the boat needed some ventilation and I wanted to do it in a way that is a little bit flexible as well as powerful. I ended up using a ball bearing 120v PC fan with speed control on a timer to run throughout times of the day. Currently set to run for an hour every four hours. Will see how that works and see if I need to adjust it. I mounted this fan inside a box I custom made that attaches to the top crib board that can be easily removed if needed. There is metal screening to prevent bugs from getting sucked in. The air gets pulled in then pushed through the boat and out the duct in the forward berth. All in all, I thought this would be a good way to keep the boat fresh and hopefully it all works as intended. Here are some photos:
Been a while since I've really been around. Had to take a couple weeks to cruise the Caribbean, but I'm back, and busy. Got boat show on my front porch next weekend and just started compiling a list of projects we plan to tackle in the near future for David. Mast is coming down to replace the sheaves and go to all rope so I plan on doing a few things while I'm up there. I think I'm going to drop the stick early spring so I don't cut this season short, and do all the work involving the mast then. I am planning to do everything I can topside and start hoarding parts in preparation. Since I am planning to rewire the mast with a new 4 pin connector and will need to make a new location for the wiring being that it is buried, does anyone know approximately the correct amount of 4-plex wiring I will need to order if I come in the ceiling in the head and down the port side to the panel?
Here is the first round of projects. Like I said, I plan to do everything on the deck asap in preparation for the mast down in the spring...
I finally replaced/put in my forth port in my boat. It is a long and slow process (especially in the eyes of the admiral), but I alwo like sailing the boat so now and then instead of just working on it. I posted the latest in a blog posting here: http://vanomad.blogspot.com/2014/10/seaford-1052014.html
A couple of projects that happened this year (sorry if the photos are too large):
LED anchor light. Really happy with this. Also replaced all bulbs with LEDs.
Plotter mount and Lowrance Depth/Plotter $150. Happy with both. You can also just make out the Weems and Plath lamp mounted to the compression post and the new 135 Ulman Genoa. The foam luff was a huge improvement over the previous genoa when partially furled.
Inside view of plotter and mount ($12 hardware store flagpole bracket, a dowel, some scrap pine and velcro). Temporary power wiring...
Charge controller for 15 watt panel. Controller mounted on aft bulkhead.
15 watt panel attached to starboard cat-bird seat. Did not have a better photo. I removed the seat, put down two angle sections of aluminum, and replaced the seat. Very simple mounting that has worked well and stays out of the way.
Replaced standing rigging. Photo is of the device that my oldest daughter and I engineered and used to rig the topping lift that I forgot to re-attach to the top of the mast. Catalina direct was very helpful and the rigging was sized perfectly.
Next is a TillerClutch. DavidB has a great list in his post. I really appreciate the ideas from everyone.
Notice: The advice given on this site is based upon individual or quoted experience, yours may differ. The Officers, Staff and members of this site only provide information based upon the concept that anyone utilizing this information does so at their own risk and holds harmless all contributors to this site.