Catalina - Capri - 25s International Assocaition Logo(2006)  
Assn Members Area · Join
Association Forum
Association Forum
Home | Profile | Register | Active Topics | Forum Users | Search | FAQ
Username:
Password:
Save Password
Forgot your Password?

 All Forums
 Catalina/Capri 25/250 Sailor's Forums
 Catalina 25 Specific Forum
 Companionway dimensions
 New Topic  Reply to Topic
 Printer Friendly
Author Previous Topic Topic Next Topic  

RockB
Deckhand

Member Avatar

20 Posts

Initially Posted - 01/01/2020 :  08:32:44  Show Profile  Visit RockB's Homepage  Reply with Quote
Does anyone have dimensions for the companionway?

I need to refinish the boards and do not want to leave the space open so I plan on cutting a piece of plywood to fill the hole while they are removed. Since the boat is not not behind my house I figured I would ask here. Hopefully someone has the dimensions so I can cut the plywood now and take it to the boat next trip.

If not I will measure next trip then cut, then swap on the following trip.

Bill
1979 Catalina 25 SK #936
Panama City, FL
https://freeboatproject.com

Voyager
Master Marine Consultant

Members Avatar

USA
5231 Posts

Response Posted - 01/01/2020 :  14:36:32  Show Profile  Reply with Quote
I don’t have that info at my fingertips but you might get a couple of large pieces of cardboard and bring them with you to make a template. Because the crib boards include a steep angle on the bottom and the top is somewhat angled, you might underestimate or overestimate the measurements by taking the inner length versus the outer length. Two thicknesses of cardboard would better approximate the dimensions.

Catalina Direct describes 4 different sets of crib boards for the C25.

Here’s one set at:
https://www.catalinadirect.com/shop-by-boat/catalina-25/hull-deck/cockpit/teak-plastic/crib-boards-teak-type-d/

That said to be on the safe side, I’d guesstimate that you’d need each piece of cardboard to be 42”x42” square.

Bruce Ross
Passage ~ SR-FK ~ C25 #5032

Port Captain — Milford, CT

Edited by - Voyager on 01/01/2020 14:44:58
Go to Top of Page

bigelowp
Master Marine Consultant

Members Avatar

USA
1736 Posts

Response Posted - 01/01/2020 :  15:45:08  Show Profile  Reply with Quote
Bill -- The dimensions vary, and quite considerably between boats. When CD sold replacement hatch boards I believe they had four different sizes based on if you had pop-top and early vs late models, etc. I bought used hatch boards from a 1981 that was being parted out. I have a 1980 and I still needed to plane all three quite a bit to get them to fit. Regrettably, for a good fit I think you will need to measure the ones you have vs relying on us.

Peter Bigelow
C-25 TR/FK #2092 Limerick
Rowayton, Ct
Port Captain: Rowayton/Norwalk/Darien CT

Edited by - bigelowp on 01/01/2020 15:45:45
Go to Top of Page

sethp001
Mainsheet C-25 Tech Editor

Members Avatar

814 Posts

Response Posted - 01/01/2020 :  16:17:51  Show Profile  Reply with Quote
I've never had anything from Catalina Direct fit. Perhaps my boat was built the Friday before Christmas. YMMV.

I suggest making a template by taking cardboard and cutting it to match your existing boards. Then go from there.


Seth
"Outlier" 1987 Catalina 25 SR/SK/Traditional Interior #5541
"Zoo" 1977 Morgan Out Island 30
"Nomad" 1980 Prindle 16
"Lost" 1988 Catalina Capri 14.2 (sold - yay!)
"Marine Tex 1" Unknown Origin POS 8' Fiberglass Dinghy
https://whichsailboat.com/2014/07/27/catalina-25-review/
Go to Top of Page

RockB
Deckhand

Members Avatar

20 Posts

Response Posted - 01/01/2020 :  18:35:45  Show Profile  Visit RockB's Homepage  Reply with Quote
Thanks for the suggestions. Template it will be.

Bill
1979 Catalina 25 SK #936
Panama City, FL
https://freeboatproject.com
Go to Top of Page

Voyager
Master Marine Consultant

Members Avatar

USA
5231 Posts

Response Posted - 01/01/2020 :  19:37:08  Show Profile  Reply with Quote
Bill, might I suggest you bring along a large black plastic bag or two so you can wrap the cardboard to make it waterproof. Then measure your resulting cardboard template to fabricate the plywood, and leave the cardboard and plastic filler in place while you bring the teak crib boards home to refinish. Next time you go to the boat bring the sheet of plywood you made and get rid of the cardboard.
Of course, if you’re concerned with potential thievery then you’d have to wait, but if you’re only worried about keeping the weather out, this should work fine.

Bruce Ross
Passage ~ SR-FK ~ C25 #5032

Port Captain — Milford, CT
Go to Top of Page

redeye
Master Marine Consultant

Members Avatar

3474 Posts

Response Posted - 01/02/2020 :  08:43:39  Show Profile  Reply with Quote
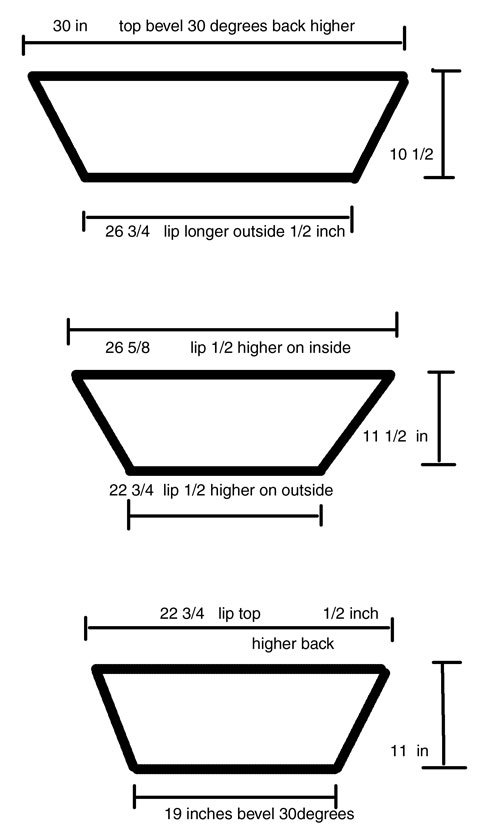
This is what I got on my boards.
.
.


This should give you a rough idea, but I would measure your boards of course.

I made some pine boards to fill till I repaired mine, but the pine boards warped pretty quickly so I could not use them long.

Reglued the joints on the OEM boards with Gorilla Glue and sanded and they are still working.

Ray in Atlanta, Ga.
"Lee Key" '84 Catalina 25
Standard Rig / Fin Keel

Edited by - redeye on 01/02/2020 08:50:20
Go to Top of Page

GaryB
Master Marine Consultant

Members Avatar

USA
4275 Posts

Response Posted - 01/02/2020 :  15:32:51  Show Profile  Reply with Quote
I laid the crib boards out on some cardboard and traced around them then stood the bottom board up on edge and traced the angle onto the cardboard.

Took the cardboard home, traced out the dimensions on a solid piece of 1/2" or 3/4" plywood (can't remember which size), cut out in one piece then beveled the top and bottom edges

Took it back to the boat and had to do a little trimming to get the top and bottom bevels just right. Dropped it in, installed the hasp and it's been on the boat since early summer. Checked on it a couple of months ago and everything was still straight and keeping the rain out.

Original hatch boards have been sanded and stained and are ready to go back on the boat. Just need time to get down and install them.

While on this subject, anyone have suggestions on removing the handrails and sealing over the holes while I bring them home to refinish? Ditto on the teak rails that the hatch slides on.

Would like to get them all done at the same time but not sure how to keep out any rain water that might fall while they are off the boat. Might take a couple of weeks to get it all done due to time restraints.

Thought about removing the handrails/hatch rails, shooting a little bit of silicone or bath caulk in the holes, and then taping a few layers of painters tape or duct tape over each hole.

Any suggestions would be greatly appreciated!

BTW... I'll be putting Andiamo up for sale once the above is completed if anyone is interested.


Association Member

GaryB
Andiamo
'89 SR/WK #5862
Kemah,TX
Go to Top of Page

exf4gib
1st Mate

Members Avatar

USA
42 Posts

Response Posted - 01/02/2020 :  15:40:21  Show Profile  Reply with Quote
A couple years ago, I took on the same project. Pretty much followed the above suggestions although using a single panel that was slightly larger than the companionway opening. Just made sure the roof slide cleared the temporary panel. Instead of an 'inside' panel however, I simply fabricated a couple of wood strips to clamp the panel to the sidewalls. I installed a bolt with washers and a wingnut to snug the inner strip against the panel on each side. The plastic bag idea is a good one to protect from moisture. I just taped the plastic over the wood 'assembly' with a good quality duct tape that didn't leave adhesive residue.

Arnie W.
85 C-25 TR/FK #4747 "Lifted"
Go to Top of Page

glivs
Admiral

Members Avatar

USA
822 Posts

Response Posted - 01/02/2020 :  19:42:21  Show Profile  Reply with Quote
It depends on how much wind your boat will "see" but when I refinished my external brightwork I bought an inexpensive white tarp on Amazon. I forget the dimensions (probably 8' x 10') but it extended from the mast to down about 1' over my temporary hatch board to seal the top and covered about half the height of the cabin portlights (i.e. covered the screw/bolt holes exposed when the handrails were removed). It was held in place with four bungies and I covered the cringles hanging over the portlghts with gorilla tape to keep them from damaging the plexiglass. Worked great.

Gerry & Leslie; Malletts Bay, VT
"Great Escape" 1989 C-25 SR/WK #5972
Go to Top of Page

Stinkpotter
Master Marine Consultant

Members Avatar

Djibouti
9013 Posts

Response Posted - 01/02/2020 :  22:18:29  Show Profile  Reply with Quote
quote:
Originally posted by GaryB

While on this subject, anyone have suggestions on removing the handrails and sealing over the holes while I bring them home to refinish? Ditto on the teak rails that the hatch slides on.

Would like to get them all done at the same time but not sure how to keep out any rain water that might fall while they are off the boat. Might take a couple of weeks to get it all done due to time restraints.

Thought about removing the handrails/hatch rails, shooting a little bit of silicone or bath caulk in the holes, and then taping a few layers of painters tape or duct tape over each hole.

Silicone is always problematic--it's just not easy to remove all traces. I've done this several times and dabbed Boatlife Lifecaulk (polysulfide) on the holes as temporary plugs. When the time comes, a screw or bolt from the inside pops it out cleanly. I also use the same stuff for most bedding except for plastic hardware--for that, LifeSeal. (I have no relationship or interest in the company, but have learned not to use the 3M polyurethane products--4200 and most especially 5200, which are tenacious adhesives, especially after they've aged a little).

Dave Bristle
Association "Port Captain" for Mystic/Stonington CT
PO of 1985 C-25 SR/FK #5032 Passage, USCG "sixpack" (expired),
Now on Eastern 27 $+!nkp*+ Sarge

Edited by - Stinkpotter on 01/02/2020 22:19:18
Go to Top of Page

GaryB
Master Marine Consultant

Members Avatar

USA
4275 Posts

Response Posted - 01/04/2020 :  23:58:59  Show Profile  Reply with Quote
quote:
Originally posted by glivs

It depends on how much wind your boat will "see" but when I refinished my external brightwork I bought an inexpensive white tarp on Amazon. I forget the dimensions (probably 8' x 10') but it extended from the mast to down about 1' over my temporary hatch board to seal the top and covered about half the height of the cabin portlights (i.e. covered the screw/bolt holes exposed when the handrails were removed). It was held in place with four bungies and I covered the cringles hanging over the portlghts with gorilla tape to keep them from damaging the plexiglass. Worked great.


Thanks glivs! That just reminded me I have a Sunbrella tarp that's made to go over the boom that I could use for that purpose.


Association Member

GaryB
Andiamo
'89 SR/WK #5862
Kemah,TX
Go to Top of Page

GaryB
Master Marine Consultant

Members Avatar

USA
4275 Posts

Response Posted - 01/05/2020 :  00:01:26  Show Profile  Reply with Quote
quote:
Originally posted by Stinkpotter

quote:
Originally posted by GaryB

While on this subject, anyone have suggestions on removing the handrails and sealing over the holes while I bring them home to refinish? Ditto on the teak rails that the hatch slides on.

Would like to get them all done at the same time but not sure how to keep out any rain water that might fall while they are off the boat. Might take a couple of weeks to get it all done due to time restraints.

Thought about removing the handrails/hatch rails, shooting a little bit of silicone or bath caulk in the holes, and then taping a few layers of painters tape or duct tape over each hole.

Silicone is always problematic--it's just not easy to remove all traces. I've done this several times and dabbed Boatlife Lifecaulk (polysulfide) on the holes as temporary plugs. When the time comes, a screw or bolt from the inside pops it out cleanly. I also use the same stuff for most bedding except for plastic hardware--for that, LifeSeal. (I have no relationship or interest in the company, but have learned not to use the 3M polyurethane products--4200 and most especially 5200, which are tenacious adhesives, especially after they've aged a little).


Forgot about the Boatlife Lifecaulk Dave! Thanks for the reminder!

Between the Lifecaulk, some Gorilla tape over the Lifecaulk, and the Sunbrella tarp I should be golden!


Association Member

GaryB
Andiamo
'89 SR/WK #5862
Kemah,TX

Edited by - GaryB on 01/05/2020 00:02:06
Go to Top of Page

Leon Sisson
Master Marine Consultant

Members Avatar

USA
1889 Posts

Response Posted - 01/05/2020 :  09:06:43  Show Profile  Visit Leon Sisson's Homepage  Reply with Quote
quote:
...anyone have suggestions on removing the handrails and sealing over the holes...?

...to keep out any rain water that might fall while they are off the boat.  Might take a couple of weeks to get it all done due to time restraints.

Thought about removing the handrails/hatch rails, shooting a little bit of silicone or bath caulk in the holes, and then taping a few layers of painters tape or duct tape over each hole.
I use a small tab of good quality masking tape over each hole. Depends on how long the brightwork will be off.  Using a couple layers of tape seems like a clever idea, outer layer to protect the inner from weather.  For longer periods I'd consider dropping the original screws in from the top with a tiny bit of sealant under their heads.

— Leon Sisson
Go to Top of Page

Stinkpotter
Master Marine Consultant

Members Avatar

Djibouti
9013 Posts

Response Posted - 01/05/2020 :  10:21:38  Show Profile  Reply with Quote
quote:
Originally posted by GaryB

Between the Lifecaulk, some Gorilla tape over the Lifecaulk, and the Sunbrella tarp I should be golden!
I typically go all winter with holes covered only by dabs of Life Caulk while I refinish my quarterboards, and last year when I replaced my hand-rails. Sometimes I leave the screws in, pointy side slightly out, and dab the caulk on top of them. (Helps me remember where they are!)

Dave Bristle
Association "Port Captain" for Mystic/Stonington CT
PO of 1985 C-25 SR/FK #5032 Passage, USCG "sixpack" (expired),
Now on Eastern 27 $+!nkp*+ Sarge
Go to Top of Page
  Previous Topic Topic Next Topic  
 New Topic  Reply to Topic
 Printer Friendly
Jump To:
Association Forum © since 1999 Catalina Capri 25s International Association Go To Top Of Page
Powered By: Snitz Forums 2000 Version 3.4.06
Notice: The advice given on this site is based upon individual or quoted experience, yours may differ.
The Officers, Staff and members of this site only provide information based upon the concept that anyone utilizing this information does so at their own risk and holds harmless all contributors to this site.