Catalina - Capri - 25s International Assocaition Logo(2006)  
Assn Members Area · Join
Association Forum
Association Forum
Home | Profile | Register | Active Topics | Forum Users | Search | FAQ
Username:
Password:
Save Password
Forgot your Password?

 All Forums
 Catalina/Capri 25/250 Sailor's Forums
 General Sailing Forum
 Moving switches around...
 New Topic  Topic Locked
 Printer Friendly
Author Previous Topic Topic Next Topic  

Prospector
Master Marine Consultant

Member Avatar

Canada
3159 Posts

Initially Posted - 04/18/2011 :  13:09:15  Show Profile  Visit Prospector's Homepage
I had a moment of clarity on teh weekend and discovered that I do not need to rewire my mast (YAY!!) but that I need to rewire my panel (Booo!). Crawling around under the tarp while all hell breaks loose is not fun, but out in the dark was the easiest way to see what lit up when while flipping switches and playing with alligator clamps. It was windy and rainy.

So I have determined that my dear PO rewired the panel, avoiding the need to use a certain fuseholder which has no guts, and that his rewire job managed to mangle things such that I have no deck light but I do have all the rest of my mast lights. Also, my gauges are illuminated, but the wires were left off the connections, presumably to save batteries.

In order to continue to have a spare breaker in the panel, I am thinking it might be a good thing to move the nav lights and "dashboard" lights into the cockpit. This panel is available from the binnacle: http://ca.binnacle.com/Electrical-Distribution-Panels/c58_196/p1514/AAA-SWITCH-PANEL-4-GANG-SPLASHPROOF/product_info.html which has 4 fused switches and a gasket on the back. My switches would be: Anchor, Steaming, Deck, Running, with the gauges attached to teh running lights circuit (turn on teh red/green and the gauges light up).

Does this sound like a fools errand to you? Where would you mount the panel? What would you put on the switches freed up below?

"Iris"
1984 FK/SR #4040
http://frosthaus.blogspot.com/

Take a minute to register your boat with the association!!
http://www.catalina-capri-25s.org/owner_questionnaire.htm

Edited by - on

britinusa
Web Editor

Members Avatar

USA
5404 Posts

Response Posted - 04/18/2011 :  14:45:08  Show Profile  Visit britinusa's Homepage
Time for a story:
I was 14 years old in London, went to work on my Saturday job in a convenience store with a basement.
Stocking the shelves and drolling over the gorgeous daughter of the store owner.
The basement only had a single lamp so it was pretty dark and tough to find the boxes matching what I needed for the shelves.
But me being a bright spark.. I noticed there were several lamps hanging from the rafters that were not working. Tracing back the wires, I found where the break was.
Then next weekend I had a screwdriver in my pocket. Down into the basement and rewired the circuit.

All done, time to test, so I flipped the switch.


BANG! All the lights went out, all the fuses popped and the basement went dark! Oh Carp!

Crawling from the blackened basement up to the store, I realized that my work had not only fried the basement electrics but the store too. All the lights were out, the fridges, freezers, fans, the works! The owner was not a happy guy. After explaining what I did, he fired me on the spot and I was out of there real quick.

Motto: Sometimes things are disconnected on purpose!


Paul

Edited by - on
Go to Top of Page

Prospector
Master Marine Consultant

Members Avatar

Canada
3159 Posts

Response Posted - 04/18/2011 :  14:47:48  Show Profile  Visit Prospector's Homepage
Sorry, I need more details.

Can you better describe the daughter?

Edited by - on
Go to Top of Page

Voyager
Master Marine Consultant

Members Avatar

USA
5418 Posts

Response Posted - 04/18/2011 :  19:20:08  Show Profile
Chris,
In your case, as you are sailing on fresh water, the outside switch panel would eventually suffer corrosion, but it would take several years. If you were sailing on salt water however, an exterior panel would not be advised.

Edited by - on
Go to Top of Page

NautiC25
Admiral

Members Avatar

USA
957 Posts

Response Posted - 04/18/2011 :  19:33:10  Show Profile
<blockquote id="quote"><font size="1" face="Verdana, Arial, Helvetica" id="quote">quote:<hr height="1" noshade id="quote"><i>Originally posted by Prospector</i>
<br />Sorry, I need more details.

Can you better describe the daughter?
<hr height="1" noshade id="quote"></font id="quote"></blockquote id="quote">
He was in the dark with a hot chic and all he was worried about was losing his job.

Edited by - on
Go to Top of Page

Stinkpotter
Master Marine Consultant

Members Avatar

Djibouti
9087 Posts

Response Posted - 04/18/2011 :  19:49:12  Show Profile
<blockquote id="quote"><font size="1" face="Verdana, Arial, Helvetica" id="quote">quote:<hr height="1" noshade id="quote"><i>Originally posted by NautiC25</i>
<br /><blockquote id="quote"><font size="1" face="Verdana, Arial, Helvetica" id="quote">quote:<hr height="1" noshade id="quote"><i>Originally posted by Prospector</i>
<br />Sorry, I need more details. Can you better describe the daughter?
<hr height="1" noshade id="quote"></font id="quote"></blockquote id="quote">He was in the dark with a hot chic and all he was worried about was losing his job. <hr height="1" noshade id="quote"></font id="quote"></blockquote id="quote">Imagine what else he might have lost...

Chris: I have two of [url="http://bluesea.com/category/62/27/productline/119"]these switch panels[/url]--one below and one up in the semi-exposed helm area, in a salt water environment. The switch labels are lit--red when off and green when on (about .01 amp draw), and each switch has a blade fuse on the back of the panel. Serious rain storms commonly douse the helm switches, with no apparent affect after four seasons now. The builder of my boat builds primarily for the Atlantic. I think you can be comfortable with a similar panel exposed to the weather in a fresh water environment.

Here's my "dashboard"--switches on the left...


Edited by - Stinkpotter on 04/18/2011 19:57:19
Go to Top of Page

OLarryR
Master Marine Consultant

Members Avatar

USA
3477 Posts

Response Posted - 04/18/2011 :  21:13:57  Show Profile  Visit OLarryR's Homepage
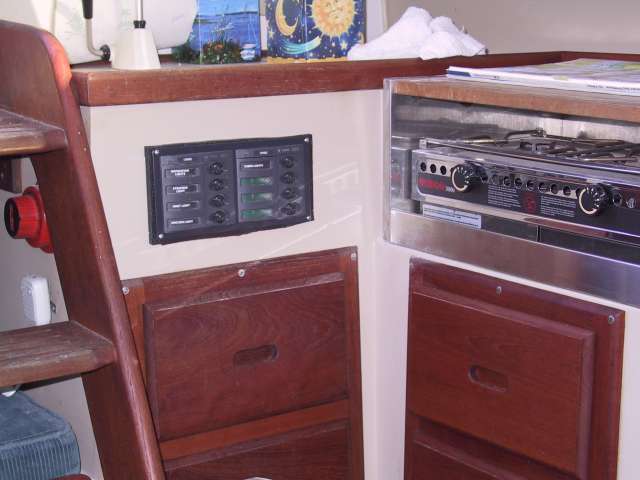
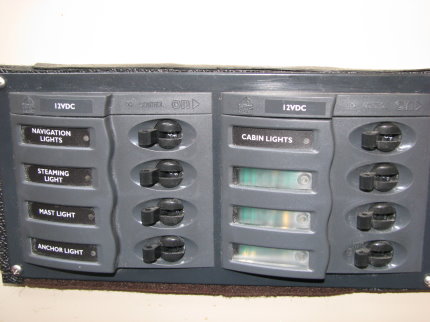
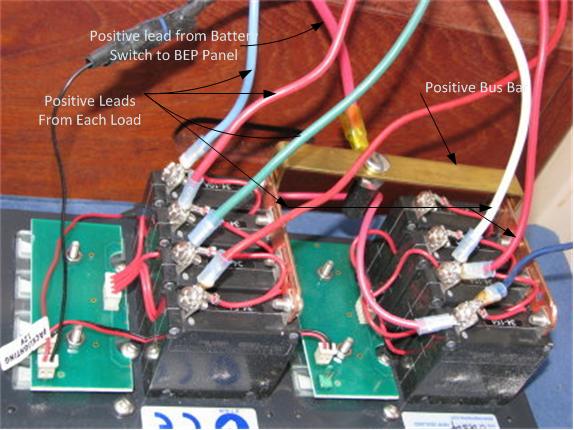
The original switch panel under the steps is extremely inconvenient for a guest to locate the right switch or for me to leave the cockpit when I am single handed sailing. But locating the switches in the cockpit also exposes the switches to the outside environment unless you purchase a weatherproof panel and only for specifcially the switches that you would need in the cockpit...such as the nav lights. Another option that allows easy access to switches from the cockpit but with switch panel in the main cabin is to locate a new switch panel in front of the sink. I still use my old switch panel for some things but have migrated many loads onto my new 8 circuit breaker/switch panel made by BEP. (I also have fans located on the new switch panel but have not put the label into the slot yet.


Edited by - OLarryR on 04/18/2011 21:15:55
Go to Top of Page

redeye
Master Marine Consultant

Members Avatar

3477 Posts

Response Posted - 04/19/2011 :  05:21:04  Show Profile
Iffin you got a snakes honeymoon at the panel and the runs terminate there, then I'd start my work at the panel.

Post an image of the front and back of the panel and the wiring harness and start drawing up a plan.

We, of course, will be happy to armchair quarterback.


Edited by - on
Go to Top of Page

Prospector
Master Marine Consultant

Members Avatar

Canada
3159 Posts

Response Posted - 04/19/2011 :  09:42:36  Show Profile  Visit Prospector's Homepage
Bruce I like the looks of that, but fear the back of the panel contacting the (steel) sink. Did you paint on some of the liquid tape or something to insulate it? Do you run the second panel as a "pony panel" as in it is switched on from the first panel, or is is a whole separate circuit off the battery switch?

My alternative to the cockpit was to go to the stbd settee and extend the back of it another foot or so into the quarter berth.

I need to look at this closely and figure out what I'm doing.

Edited by - on
Go to Top of Page

OLarryR
Master Marine Consultant

Members Avatar

USA
3477 Posts

Response Posted - 04/19/2011 :  11:00:40  Show Profile  Visit OLarryR's Homepage
If you are referring to the photo with the switch panel below the sink, the inner works run close to the sink but their is clearance and I have double thick insulated tape on the underside of the sink as added protection. I could have lowered the switch panel another 1/8" or so but it is fine the way it is right now and I can easily reach in to get to the nav lights and steaming lights switch from the cockpit. One thing I also checked out with regards to locating the panel under the sink was that I checked out several different panels before going with the switch panel from BEP. The BEP panel had the right inside dimensions to make it possible to install under the sink.

The original switch panel behnd the steps is also functioning. I left the old panel with switches for the VHF base radio, fishfinder and powering 2 12 volt DC accessory plugs located in the cabin. I could move these over to the new switch panel but for now I'm leaving it as is in case I think of some addl loads to power off the new panel.

Edited by - OLarryR on 04/19/2011 21:20:15
Go to Top of Page

pastmember
Master Marine Consultant

Members Avatar

2402 Posts

Response Posted - 04/19/2011 :  11:35:04  Show Profile
I added some circuits, but a main accomplishment was a new ground buss. I added the panel so guests could turn on running lights easily and added the cabin light so anyone could find the light!


Edited by - pastmember on 04/19/2011 11:48:25
Go to Top of Page

Stu Jackson C34
Admiral

Members Avatar

844 Posts

Response Posted - 04/22/2011 :  08:35:16  Show Profile
I worked with a C30 owner by email on his boat's electrical systems and he was adamant about having an external panel for his running lights. While did it, I cautioned him against it because of the possible damage to the external panel components. It is not really that hard to hop down below to turn on a couple of switches. Whether you use a bungee cord or an autopilot, there's not much that can go wrong in those few seconds. If in doubt, heave to for a moment.

Edited by - on
Go to Top of Page

panhead1948
Captain

Members Avatar

345 Posts

Response Posted - 04/22/2011 :  20:01:04  Show Profile
Thanks for the idea. I sail by myself alot and leaving the cockpit to find the light switch in the dark is a pain. I found a two gang switch from Jamestown for 47.00. I can move the running and steaming lights to the cockpit.

Edited by - on
Go to Top of Page

mhartong
Navigator

Members Avatar

USA
152 Posts

Response Posted - 04/23/2011 :  11:32:02  Show Profile  Visit mhartong's Homepage
<blockquote id="quote"><font size="1" face="Verdana, Arial, Helvetica" id="quote">quote:<hr height="1" noshade id="quote"><i>Originally posted by Prospector</i>
Does this sound like a fools errand to you? Where would you mount the panel? What would you put on the switches freed up below?
<hr height="1" noshade id="quote"></font id="quote"></blockquote id="quote">

No, does not sound like a fools errand at all. The original stock panels just do not support the clean (and easy) installation of additional loads.

I replaced the original DC panel with a 30 amp 4 switch AC panel (Master, Outlets, Charger, Spare) and added the new DC panel and was able to set out a single load per switch (Master, Cabin Lights, Sailing Instruments, GPS, Autopilot, Tank Level Indicators, Running Lights, Deck Light, Steaming Light, Radios, Anchor Light, 2 spares)


I will second Stu on having the panels below decks. It only takes a few seconds to pop below and throw the switches, they are in a more protected location, and it is one less thing that you have to cut holes for where you could have water get into.


Edited by - on
Go to Top of Page

ilnadi
Captain

Members Avatar

452 Posts

Response Posted - 04/25/2011 :  07:50:07  Show Profile
We put the new panel behind the port settee next to the galley cabinets. [url="http://www.sailblogs.com/member/enka/?xjMsgID=4399"]The blog is here[/url]; the picture link is broken but I have the pictures in case you need them.

Edited by - on
Go to Top of Page

redeye
Master Marine Consultant

Members Avatar

3477 Posts

Response Posted - 04/25/2011 :  13:32:23  Show Profile
I always thought it would be easy enough to put a water proof push button switch in the rope locker holder thingie underneath the winch on the port side. Forward in there, you could just drill a hole, drop in a switch and bypass the panel switch, still using the fuse. An easy run and the run would be out of the way on the roof of the dumpster. I've got my front and rear nav lights ganged on one circuit, so it would be one switch only.

That's the only switch I'd like fast access to from the helm.

Kinda hidden from the elements...

Anyhoo.. that was always my solution to that "problem" but it is low on a big list...after the pony beer keg and the tap.


Edited by - redeye on 04/25/2011 13:34:01
Go to Top of Page

Prospector
Master Marine Consultant

Members Avatar

Canada
3159 Posts

Response Posted - 04/26/2011 :  06:06:45  Show Profile  Visit Prospector's Homepage
Woo-Hoo, the switches work!!

I took Larry's approach with the front-of-sink mount. Rather than buy a new panel, I used the one I bought off the swap shop a while ago, which is from an older boat, but still has a main switch before all the circuits. I also installed a stereo beside the panel - kinda in the location of Frank's light. The sink drain is in the way of the radio, so I plan on installing a 1" thick wooden plate across there, which will make the face of the sink flush with the bumpout where the original stove was - in Frank's pic he has some sea-rails mounted to that bump.

Some amazing discoveries that came of rewiring the panels...
1. All the lights on the mast work properly! Despite the fact that there were 3 wires in the deck and 4 wires in the mast, the mast had been wired with the steaming and deck light on separate circuits. Saved me much effort.
2. My gauges are all backlit! I never knew that until about 3 days ago.
3. My compass light works! I had fiddled with the compass light, trying to get it to work before but never had success. I had assumed the bulb was dead.
4. The depthsounder transducer was wired direct to the AC Main. I am not sure, but I think it may have been firing continuously, even if the sounder display was turned off.
5. I am not totally incompetent when it comes to 12V DC stuff, sorting this out was not the nightmare I was fearing at all.

I now have all the stuff working independantly, but my next step has to be adding in the peripherals. Building speakerboxes and mounting them. Building a mounting plate for the face of the sink and mounting the stereo and panel to it, and interconnecting the GPS and VHF (again), and building the amazing GPS/Fishfinder swingarm as found on various posts in this forum.

The GPS and VHF conection is proving difficult. Previously I had a Lowrance Handheld GPS connected to the DSC Radio, but this spring I picked up a Standard Horizon Chartplotter and it doesn't want to talk to the Standard Horizon Radio for some reason. Always something to figure out.

Edited by - Prospector on 04/26/2011 06:09:55
Go to Top of Page

redeye
Master Marine Consultant

Members Avatar

3477 Posts

Response Posted - 04/26/2011 :  11:02:34  Show Profile
Hey that's great! beats the heck out of having to rewire the mast.


Edited by - on
Go to Top of Page

OLarryR
Master Marine Consultant

Members Avatar

USA
3477 Posts

Response Posted - 05/01/2011 :  13:29:38  Show Profile  Visit OLarryR's Homepage
Chris,

Looks like I missed a bunch of things while I have been away. I was on a business trip to Hawaii...checking out a really big boat...anyway, looks like you have done the deed ! Congrats on mounting your panel !

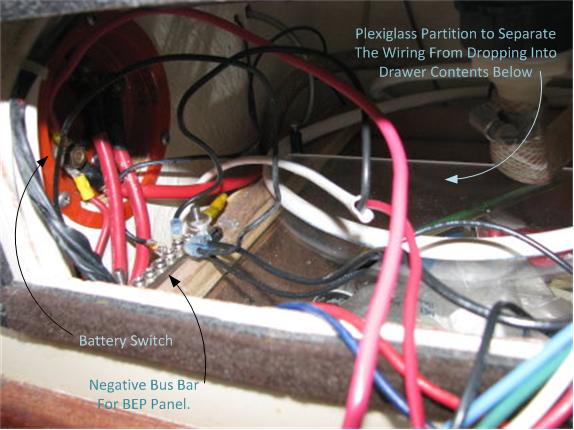
Similar to Frank, I forgot to mention that I also have a negative bus bar installed for the new panel. Photo is below but not a great photo - It was taken from the best angle I could manage - It's located right below the battery switch.

Given all the electronic gizmos it sounds like you will be using, you may want to consider hooking into your new panel a 12 volt line to feed some 12 volt accessory plugs located in different areas of the main cabin/facilitate use of a portable device in the cockpit.


Edited by - on
Go to Top of Page

Prospector
Master Marine Consultant

Members Avatar

Canada
3159 Posts

Response Posted - 05/01/2011 :  15:11:17  Show Profile  Visit Prospector's Homepage
Au contrere, mon frere...

writeup will hit the iris blog shortly (I think tomorrow) but I ended up keeping the original Catalina wiring loom and re-routing it to the undersink panel. All the added stuff fit nicely on the new panel. A 12 V outlet is contemplated as you suggested, I just haven't done it yet...

Edited by - on
Go to Top of Page

Prospector
Master Marine Consultant

Members Avatar

Canada
3159 Posts

Response Posted - 05/03/2011 :  08:53:06  Show Profile  Visit Prospector's Homepage
Fudge. Dammit. Double Damn.

The whole mounting plate/panel thing is coming together really nicely. I'm up to about 5 coats of varnish on it and the finish is great. Last night I drilled to put in teh 12 volt outlets after finally hunting them down. It was harder than you'd think to find 12V outlets with a LED light around them so they illuminate at night. Eventually I found a pair though.

To accommodate the lights, I had to drill into the back of the panel with a 1-3/8" hole to accommodate the extra diameter of the light in the outlets, then chisel out a alcove for the light holder to sit in. Then, the opening in the board itself had to be 29/32" diameter, with wood 1/4" thick.

I had 2 12V outlets to install.

On teh first one, everythign went as planned, until teh final hole. I flipped the board over so any breakout would be on the back of teh hole, stuck the spade bit into the hole left from drilling the back of the board, and immediately the drill grabbed the teak, twisted sideways and dug into the side of the hole, drilling a lovely ellipse. The faceplate for the 12V outlet isn't big enough to hide the damage.

My once-perfect mounting board now has the mark of the kludge. Oh well. Maybe I'll have a brass plate made up to cover it or something.

ETA - I may have to get one or more of these inserts to go in the lighters... http://www.iboats.com/SeaDog-SS-Cigarette-Lighter-Chart-Light/dm/view_id.39735

Edited by - Prospector on 05/03/2011 08:59:39
Go to Top of Page

Stinkpotter
Master Marine Consultant

Members Avatar

Djibouti
9087 Posts

Response Posted - 05/03/2011 :  14:53:34  Show Profile
<blockquote id="quote"><font size="1" face="Verdana, Arial, Helvetica" id="quote">quote:<hr height="1" noshade id="quote"><i>Originally posted by Prospector</i>
<br />Fudge. Dammit. Double Damn... My once-perfect mounting board now has the mark of the kludge...<hr height="1" noshade id="quote"></font id="quote"></blockquote id="quote">That's how we'll know you didn't buy it at Boater's World--made in China.

Edited by - on
Go to Top of Page

Prospector
Master Marine Consultant

Members Avatar

Canada
3159 Posts

Response Posted - 05/03/2011 :  18:48:17  Show Profile  Visit Prospector's Homepage
Well its all in place now. I need to get some screws to hold it there, but the install went mostly painlessly. Unfortunately SWMBO is out, and I can't find her camera.

It looks really good (IMHO)

Edited by - on
Go to Top of Page

Prospector
Master Marine Consultant

Members Avatar

Canada
3159 Posts

Response Posted - 05/13/2011 :  19:27:16  Show Profile  Visit Prospector's Homepage
Project complete (except for hooking up the stereo speakers). Thanks for th ehelp and info guys. It looks like this: http://littleboatiris.blogspot.com/2011/05/big-install.html

Edited by - on
Go to Top of Page
  Previous Topic Topic Next Topic  
 New Topic  Topic Locked
 Printer Friendly
Jump To:
Association Forum © since 1999 Catalina Capri 25s International Association Go To Top Of Page
Powered By: Snitz Forums 2000 Version 3.4.06
Notice: The advice given on this site is based upon individual or quoted experience, yours may differ.
The Officers, Staff and members of this site only provide information based upon the concept that anyone utilizing this information does so at their own risk and holds harmless all contributors to this site.