|
|
|
|
|
|
|
|
|
|
|
|
|
|
|
|
|
|
|
|
|
|
|
|
|
|
|
|
|
|
|
|
|
|
|
|
|
|
|
|
|
|
|
|
|
|
|
|
|

 Minnie - Wing Keel Conversion
Page 1 - Mike Leyden's Wing Keel Installation By Bill Holcomb
During his fall haul-out, Mike Leyden didn't get his Catalina 25s keel fully retracted before the boat settled onto the trailer. The crunching sound that came from the keel trunk as the boat settled was alarming to say the least. Mike assessed the damage and found that the cable attachment fitting on the keel end of the cable had "flopped over" rather than finding its way into the cable hole. The resulting damage to the keel trunk was enough to convince Mike that he wanted to change to the wing keel by using the retro-fit option that is offered by Catalina.
Mike and I made plans to install the new wing keel "sometime" in the spring. What follows are some thoughts that Mike and I have following the installation:

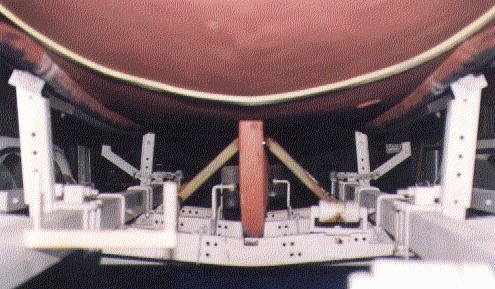
First of all, Mike had an almost perfect facility to do the work in. He works at a medium sized machine shop that has several overhead cranes. These cranes made moving keels and lifting the boat much easier than would have been otherwise possible. The cranes also made positioning the boat over the keel trunk (and the holes we'd drilled) very easy. The boat could be moved a little ahead, or to the right, or a little down at the bow, etc. The arrangement that Mike devised was to use two overhead cranes, one to lift the forward part of the boat and the other to lift the aft half. He prepared a nine foot long "spreader" bar to keep the 4 inch nylon straps from exerting too much pressure against the sides of the boat, and also fashioned two connecting straps to keep the lifting straps from slipping toward either end of the boat.
Second, after you've received the keel, bolt hole template, resin, fiber-fil, etc.; think, think, think. What are the steps that you expect to go through, and in what order. Things like:
A - Bracing the old keel so that it won't "flop" over.
B - How will you lift the boat off of the old keel. You need to be able to lift the boat up about two and a half feet altogether.
C - Where will you put the old keel, and how will you get it there after it's been unbolted from the boat.
D - How will you get the new wing keel under the boat.
E - Do you have a long enough drill bit to drill the six 3/4 inch holes for the keel bolts. And, do you have a long 1/4 inch and 1/2 inch drill bit to drill a pilot hole and second hole before you drill the 3/4 inch final hole.
F - Do you have a method for "sanding" off all of the old bottom paint that has been painted on the bottom of the boat and in the keel trunk. This was the hardest single job in the whole process for us.
G - How will you make sure that the boat is lowered onto the keel bolts without a "near miss" and subsequent damage.
H - How will you stir the fiber-fil (the bedding compound that makes a water-tight seal between the keel and boat) and its hardener. The fiber-fil has the consistency of green tooth paste and needs to be thoroughly mixed with hardener to set up correctly.
I - What kind of hole in the cabin floor will you cut and how will you cut the holes so that you will be able to put the washers and nuts on the keel bolts. And, of course, how will you want to finish the hole in the cabin floor after the keel is bolted to the bottom.
J - How will you "fair" the junction between the flange on the wing keel and the bottom of the boat. What do you want this part of the boat to look like when you're through.
K - Will you need to drill new holes in the trailer bunks support pieces to accommodate the taller keel.
Well, you can see that the 5 "P's" (Prior Planning Prevents Poor Performance) really come into play with this project.
 For us, everything went pretty smoothly. With the two cranes ready, Mike unbolted the old keel hangers. The keel was resting on the trailer in its normal "travel" position. Mike had also made an extra brace to keep the keel from flopping, and had already removed the keel cable winch from inside the boat.
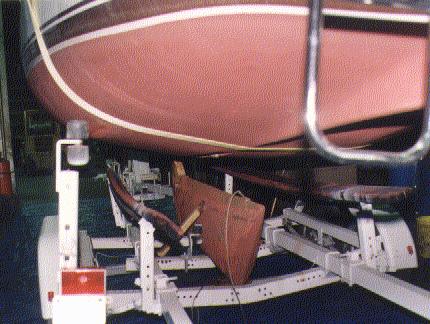 We then lifted the boat straight up about a foot or so. Mike pulled the keel cable out of the hole and we used a forklift with a ball on one fork to move the trailer forward and out from under the boat. We now used a boom-crane to lift the old keel off of the trailer, and then positioned the trailer back under the boat.
One little surprise that we had when we lifted the boat off of the old keel was that we had not gotten the slings just right and the boat tilted a bit when lifted. When we lowered the boat back onto the bunks to sand the bottom, it was necessary to reposition the slings so that the boat would lift straight up and not tilt. This took a couple of tries lifting the boat off of the bunks to get the slings just right.
Now Mike loaded the old swing keel onto the forks of the fork lift and we took the keel out into the yard and deposited it on a couple of 6 X 6s.
Continue to Page 2