Notice:
The advice given on this site is based upon individual or quoted experience, yours may differ.
The Officers, Staff and members of this site only provide information based upon the concept that anyone utilizing this information does so at their own risk and holds harmless all contributors to this site.
My question, I am getting ready to re-bed my Stanchions, and other deck hardware, as well as replace my knot meter, depth gauges thur hulls. (replaceing thru hulls, because there are already holes so figure may as well use them) For the Stanchions and other deck items I am going to fill the holes with epoxy and redrill as was suggested here, sounds like a good idea, so going to do it. I have basic understanding from other threads as to the process of how to do the work, just wondering about the recomend products. first question would be... What type of epoxy should I use, where to purches? What type of sealeant after redrilling, and putting stanchions back on? and what type sealeant for below water line? also redoing gudgeons. thanks for the help.
Use a 2 part epoxy for the hole filling. You should add a structural thickener like short chopped fibers. You could also add pigment to make it white or any other color. The west systems with the pump are particularly nice as you can easily mix small amounts.
The stanchions should be bedded with a removable sealant like silicone. 3-m makes nice sealants.
for thru-hulls, I use 5200. It is the mother of all sealants and most people are scared by its adhesive properties. It can readily be removed with heat. <s></s> I hope this helps.
Sorry, but I disagree on the silicone for bedding deck hardware. If it gets smeared the slightest bit, you'll have a discolored smear on your deck forever. And it's very difficult to remove when you need to re-bed. The right stuff for the job is any of the polysulfide caulks such as Life Caulk (NOT polyurethane like 3M 5200). They clean up easily, stay resilient for a long time, don't glue the hardware to the deck, and can be removed fairly easily for re-bedding. 5200 is too adhesive, and can damage gelcoat when you try to remove something. I don't know about using heat... But I recommend 5200 only for things that are essentially permanent.
A key when bedding hardware: Hand-tighten only enough to squeeze a little caulk out, leave it to cure for two days or so, and then tighten the nuts with a wrench from below so that you put pressure on the "gasket" that has formed and don't break the seal around the bolts. I prefer trimming the excess after it's cured--a razor blade does nicely, and you can sometimes almost zip the excess off with your fingers.
You probably don't need to use colors in your epoxy--it should be covered by the hardware above and the fender washers below. But the chopped glass fibers are a good suggestion for thickening. Also, I stay away from fast-cure hardener--it makes your timing more critical and generates a lot more heat. Also, before applying the epoxy, carve out 1/4" - 1/2" of the core around the hole so the epoxy is partially contained by the fiberglass above and below--you don't want it to be like a cork in a bottle. You can do the carving with a bent nail in a variable-speed drill.
Best of luck--you're doing it the Bristol (note different spelling) way!
A good friend taught me how to make a neat & clean finish to rebedding hardware. When the area is cleaned up and ready for bedding, use the blue masking tape to tape around the footprint. Hold the hardware in place and cut around its base using a very sharp knife. Lift off the hardware and remove any cut off "inner" tape. After rebedding follow Dave's advice and tighten only thumb tight. After finally tightening, the tape can be lifted off taking all the surplus sealant with it. Result - sharp clean edges.
Great advice from atgep, Dave Bristle, and Derek Crawford. I use all those, or similar techniques myself. To get a nice consistant thick bedding "gasket", I slip three short pieces of popsicle stick shim under the very edge of the deck fitting as far as practical from the boltholes. (Only maybe 1/16" of shim extending under the fitting.) Then initially only draw down enough to trap the shim, but not enough to crush it. After curing, pull shims, tighten nuts, cut squeeze-out, lift tape, admire finished job, congratulate self on workmanship.
Bear- With the projects you have planned do your self a favor and buy the gallon and quart jugs with pumps of West System epoxy and the large containers of thickening agents. Last time I found the best price at Defender. I started using 3M 4000UV instead of 4200 because it is compatible with more materials, doesn't turn yellow and I think a little easier to work with.I usually bevel the fastener holes with a countersink bit so a 'donut' of sealant forms around the fastener. I used epoxy coated plywood backing plates when I rebedded my stanchions and replaced the gudgeons. Cool boat name! Good luck.
<blockquote id="quote"><font size="1" face="Verdana, Arial, Helvetica" id="quote">quote:<hr height="1" noshade id="quote"><i>Originally posted by ct95949</i> <br />I usually bevel the fastener holes with a countersink bit so a 'donut' of sealant forms around the fastener.<hr height="1" noshade id="quote"></font id="quote"></blockquote id="quote"> I do too... But in fiberglass, this works best if you run the drill in reverse so the bit doesn't grab and dig in too far. I like Leon's popsicle stick idea--he always goes me one (or two) better!
I am getting some great feed back, but came up with another question. The deck under the mast step, does it have wood core? I noticed a very small stain on the inside of the cabin by the compression post, so I am going to also redo the mast step. If there is wood, I would use that get rot stuff. Any other thoughts?
<blockquote id="quote"><font size="1" face="Verdana, Arial, Helvetica" id="quote">quote:<hr height="1" noshade id="quote"><i>Originally posted by bear_tm4</i> <br />The deck under the mast step, does it have wood core? I noticed a very small stain on the inside of the cabin by the compression post, so I am going to also redo the mast step. If there is wood, I would use that get rot stuff. Any other thoughts?<hr height="1" noshade id="quote"></font id="quote"></blockquote id="quote"> Yes, the compression post is under the plywood-cored deck. My mast step was held by four thru-bolts just barely forward and aft of the post. I've heard others speak of lag screws into the post, but I haven't seen that. You can check the core--it isn't necessary rotten just because of a little stain... and use some get-rot or other penetrating epoxy if necessary--plug the bolt holes from below and then fill them with the epoxy so it can soak in around the holes. Then use the techniques above to mount and bed the step. This is one place to be sure not to turn the bolts after you've bedded the step--only the nuts from below.
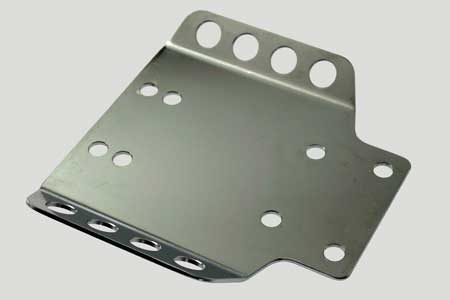
Another thing to think about if you don't already have it--this is the perfect opportunity to add Catalina Direct's mast base plate with holes for swivel blocks to lead lines out to deck organizers and back to the cockpit. The plate mounts under the original step, and looks like this: ...even if you don't use it right away.
I check my step today, and the screws dont go thru the deck. Its also possable the the leak is from the power connection for the mast lights. So will replace the connector and seal it, then fill the mast step holes drill out and seal it, I think that will solve that problem area. Now the next problem I found today was the source of more leaks. The source is the genoa tracks that run along the edge of the deck, thats alot of nuts and bolts...so will make job a little more involved, but should solve many of my problems.
Notice: The advice given on this site is based upon individual or quoted experience, yours may differ. The Officers, Staff and members of this site only provide information based upon the concept that anyone utilizing this information does so at their own risk and holds harmless all contributors to this site.