Notice:
The advice given on this site is based upon individual or quoted experience, yours may differ.
The Officers, Staff and members of this site only provide information based upon the concept that anyone utilizing this information does so at their own risk and holds harmless all contributors to this site.
Deric - Sounds like that was quick work with the wire mod ! Good luck with the motor !
Redeye,
You are right about the LEDs being expensive (those with housings) and prices likely to drop. The cost of the running light LEDS has already started to drop - Aquasignal has LED versions that are cheaper than the ones sold by OGM and Lopolight.
At time I replaced my non-working anchor light, I decided to go for it at that time and bought an OGM LED nchor Light with a photo-diode that turns it off automatically when the sun comes.
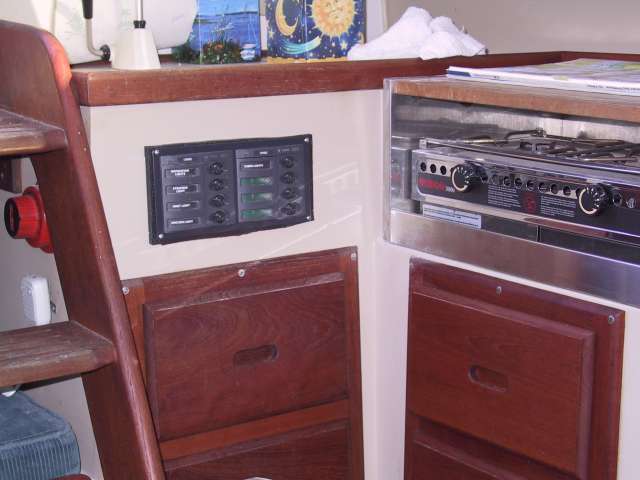
When I replaced all the wiring in the mast and then in the cabin, I did the cabin wiring to a new control panel that i can access from the cockpit. My old switch panel still is working but it's inside the cabin under the steps which is very inconvenient to get to especially when single-handed sailing. Here is location of new BEP 8-circuit breaker/switch panel:
Hey Larry, I like that location (a lot!) I was thinking of puttin gth eradio there. Any problems with splashes/drolls from the sink getting it wet there?
I spent a good day working on the new wiring. I don't feel like it was quick work. Heh. The LED steaming light and anchor light will be better than what I had last year. I remember taking the mast down and the original steaming light had water in the clear plastic bowl. It looked like a miniature fishtank; albeit no fish.
Next year when before the sailing season begins, I'll schedule to had a steaming light fixture that has a deck light.
The ol' Chrysler motor: heh, I ordered spark plug cable, and a carb rebuild kit.
Anyway, the wiring is now a non issue, and as I said before, each new project helps me learn more about my classic boat, and those that are newer.
For those who may need to replace the wiring from the panel to the deck connector on a 1978, don't bother to pull the wires or look for them: run new wires and be done with it.
I usually use the sink only to keep some water bottles hanging in it, so cannot conclusively tell you that splashing is not an issue. The BEP panel is somewhat recessed on part of the panel and the switches are also recessed. The only real issue is that the back of the panel comes a wee bit close to the SS sink basin. It does not touch but is about 1/4" from a section of the basin. I covered that area of the basin that comes closest to the back of the circuit breakers with strips of self-sticking thick rubberized tape.
BEP is a New Zealand Mfr but they have a US distributor. A number of mail-order places sell their equipment and Boater's World use to sell their stuff until Boater's World went "down" under. I liked the design of the panels with the recessed areas and the arrnagement of the switches. The dimensions also seemed best suited to where I was locating it.
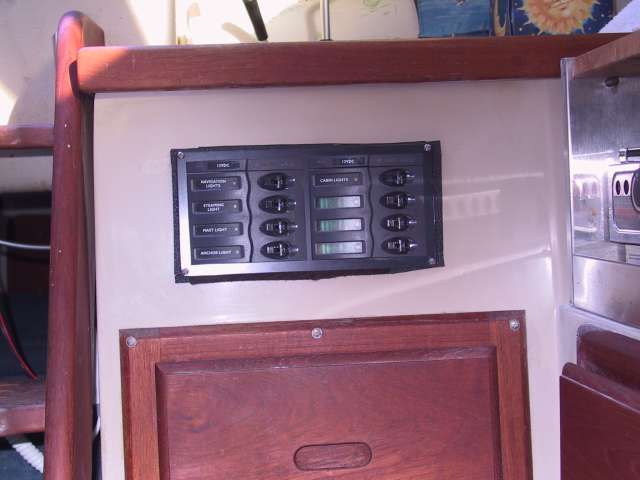
Here is the panel with labels I have added so far that came with labels BEP provided. At top, closest to the companionway and in order going down is: Navigation Lights; Steaming Light; Mast Light; Anchor light. I pujt them in this order because that is the way I would most commonly use them. The two most important - Switch on the navigation/running lights from the cockpit and then followed by the Steaming Light. That is why I have them located at top for easy access. The Mast/Deck light and Anchor light are not used that often and I do not have to fiddle with them while sailing - That si why I have them located lower on the panel, though, still easily accessed.
The 4 switches on the panel furthest from the companionway are not fully used yet. I am only using the top 2 of which only the top one "Cabin Light" is labeled. The unlabeled one below it is for my 2 fans. BEP did not include a label for "Fans" and that is the way I want it to read. I will probably run something off my PC and laminate it or something and stick that in there. Some things to note: When "Cabin Lights" switch is "On", I have it rigged so the panel lights then illuminate via LEDs for all switch labels. Otherwise, no LEDs light up the labels. If a switch is "on" then the little circle next to the label always illuminates but all labels will illuminate when the "Cabin Light" switch is "On". That can be modified to a person's liking - that's the way I selected.
Nice job Larry! A couple of quick questions. How did you wire power to your new distribution panel? I assume your main DC panel is still functional so 1) did you dedicate a new breaker on the main panel to handle the projected load to the distribution panel, and 2) any plans for the remaining breakers on the original (main) panel?
First - Correction to my earlier response. I believe BEP did have a label for "Fans". It's just that I installed the Fans last onboard and had already had the panel up and running. I was too lazy to undo the panel screws and stick the "Fans" label in the slot. So...I will have to do that ..eventually.
Gerry,
The main panel under the steps is still functional but was overloaded. The previous owner had one of the switches with a terminal attached that allowed attachment of 3 separate loads off of one of the switches and these terminals were so close to the live bar in the panel, that I finally understood why my VHF radio always came on whether I had the switch panel switch on or off ! The terminal was bypassing the switch !
My main thing was to move those things that I wanted access from the cockpit onto the new panel and to also move some addl loads for convenience onto the new panel. However, since there is nothing wrong with the old panel, I left some loads still on it. My VHF radio switch is still on the old panel - I may eventually switch that to the new panel as well. I also have the accessory plugs on the old panel. There is one 12 Volt accessory plug adjacent to my old panel and I added another forward but in main cabin starboard side near the bulkhead under on the seat fibergalss wall. I may have one other load on the other panel but cannot recall....Have to check.
As far as how the new panel is wired to power it up...I have to take a look because I cannot fully recall. I originally had the panel hooked p as follows: The negative lead was to the battery. The positive lead was to a screw on the top of the live bus bar in the old panel. The old panel had one main circuit breaker versus the new panel that each switch is a circuit breaker. Having the positive lead to the top of the positive bus bar in the old panel was convenient and bypassed the old panel switches but still had the old main circuit breaker in the circuit. I have to check how I have it hooked up now but I believe I hooked it up similar to the way the old panel is hooked up - The positive lead directly to the battery switch panel.
I may be down to the boat today -- I'll check and refresh my memory cells.
Notice: The advice given on this site is based upon individual or quoted experience, yours may differ. The Officers, Staff and members of this site only provide information based upon the concept that anyone utilizing this information does so at their own risk and holds harmless all contributors to this site.