Notice:
The advice given on this site is based upon individual or quoted experience, yours may differ.
The Officers, Staff and members of this site only provide information based upon the concept that anyone utilizing this information does so at their own risk and holds harmless all contributors to this site.
I have searched the topics but can't find what I'm looking for.
My starboard bulkhead has (2) 4in holes. One was for the depth sounder and the other was for the knot meter. I have plans for the one hole of a speaker but the other hole is my other problem.
I know this is an issue for others too but I just want that hole to look decent. I have not yet found a depth sounder that fits a 4in hole. It looks like others have had the same issue.
Has anybody found a 4 in depth sounder? Stupid question? Is there a round fish finder? Again I think I know the answer but had to ask.
I have toyed with using various items to cover the hole but so far nothing strikes me. I want to avoid teak because of the maintenance. I have found some plastic pieces that are round and could fit but I'm trying to keep it looking like it's supposed to be there.
I am not going to go through filling and re-doing the gelcoat on the whole bulkhead. I just don't think it will ever match the rest of the cockpit.
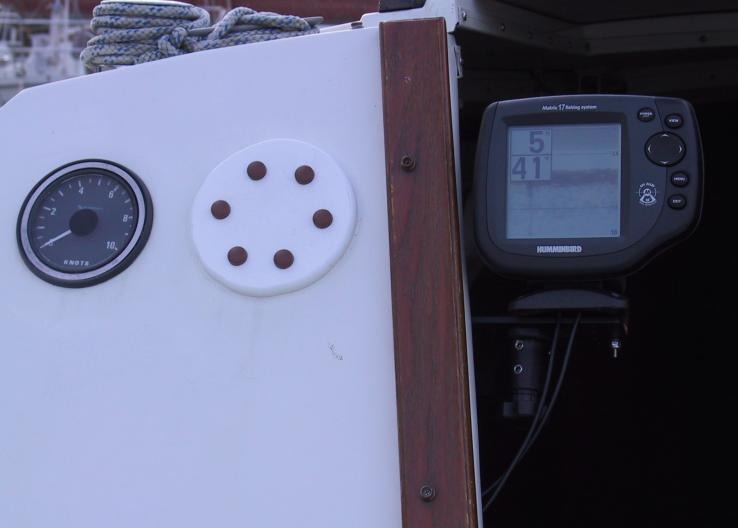
As of right now I plan to use a round piece of plastic plating I found and mount the display in it.
There are several 4" instruments on the market (e.g., Raytheon) however, they are expensive.
Several folks have discussed what they did to fill the holes or mount 2" instruments in the 4" holes. The most recent of these discussion included pictures. A search of the forum should get you to it.
I believe SR Mariner uses a 4" hole to mount their equipment. If your old depth meter is SR Mariner, don't toss it! They are out of the Marine business but offer amazing service!!
Prospector is right. They can be repaired relatively inexpensively.
I have a couple of 4" SR Marine Guages (depth and knot)that don't work. I called up SR Marine (or whatever they're now called) and spoke with a very nice gentleman who told me how to test each gauge. He said it shouldn't cost more than $250.00 to refurbish these guages. I can't remember if that was for one or both. I'm thinking it was for both. I haven't had time to test them yet but plan on doing that in the next few weeks.
Gary, in a follow up to your earlier thread, we contacted SR Mariner about our wind instruments. We will be sending ours in shortly as well. When I sent pics, the tech emailed back that the one gauge was likely scrap, but found us a replacement, and a cost to repair the other gauge. Saved us a pile of cash, and gave great service. Like you I have yet to send the gauges in, but I will post a follow-up once we do.
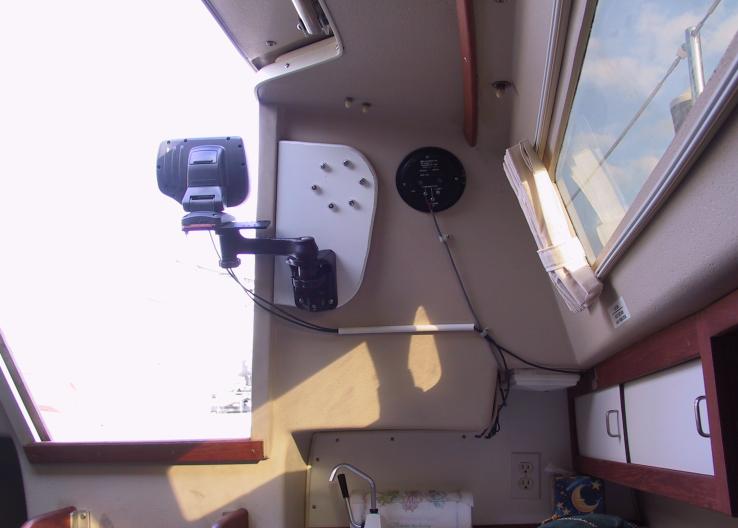
I have SR Mariner instruments and replaced the depthfinder with a fishfinder. The details are on my website. Here a couple of photos to highlight the installation:
If you have the speaker in the hole on the starboard side, you can test whether a compass can be placed in the hole on the port side without magnetic affect.
I believe you will find a compass that would fit in the hole as if the hole was made for the compass; hence, your desire to give the impression that the hole was made for something is accomplished.
I too, face the same scenario as you. Your idea of the speaker in one hole appeals to me, and that is what I shall do.
BTW - If those speakers are only sold in pairs, write me, perhaps we can split them.
I have a port hole to consider. My research has resulted in heeding the advice of others that sailboats should have a compass in addition to a GPS. One never knows when the electronic device may fail.
Scooter, Hmm... I reread your post and now I am thinking that if the two 4inch holes are next each other - - simular to pictures provided by OLarryR - - then perhaps a plate with a 2" digital depth finder will do the job.
I have seen the 2" depth finders priced 80-100 bucks.
I bought one of the 2" depth sounders this year. My 4" guages are on the starboard side, and I plan to remove them. They're shot. For example, I can only view them with polarized sunglasses - the LCDs are invisible without them.
The knotmeter paddlewheel gets gunked up by about June, so it becomes inoperable at that time.
Likewise, the depth sounder transponder also cruds up, so I get only random numbers from the depth sounder. Very frustrating.
I plan to replace the depth sounder with the 2" model. The transponder will go on the transom. I'll create a 4" plastic bezel using something like an inspection port. I'll cut a 2" hole in it for the gauge and mount it back in the same 4" hole.
For the 2nd hole, I plan to get another inspection port and mount a holder for my hand-held GPS. I have to find a 3V voltage regulator to build a battery replacement for the 2AA batteries.
Thanks all for the good ideas. I am going to start looking for an inspection plate that will fit a 2" display for the depth sounder. I like the idea about it looking more like a boat part then a "rig". Some rigs can look good but I also have limited time. I hope to finish several projects before launching around Easter.
1. Remount a Lifeline Stanchion. 2. Replace the depth sounder. 3. Replace the Antenna (Lightning strike last year) Blew the whip clean off and actually shattered 3 rocker switches on the power panel. (NOTE: I found replacement rocker switches at the auto parts store cheap. Fit right in the old holes.) 4. Fill hole for old Knot Meter (Will use VHF speaker) Sorry Deric. I plan to keep the second speaker for a spare. I went cheap and want to see how they hold up. 5. Re-seal forward hatch. 6. Re-seal Port shroud plate. 7. If time re-paint bottom. 8. Replace motor bottom unit oil.
These are besides cleanup, polish, lube sail tracks, etc.... I am also re-doing my dinghy's bottom boards and paddles.
Better stop now before I get scared.
If you don't simply enjoy doing some of these things you're in the wrong game.
Good luck resealing the forward hatch! I tried and could not get the frame out. I found a small bead of silicone pretty much fixed it. I also bought a hatch cover which contributes to keeping it leak free. I hate the solar gain from the hatch so my cover is permanent to me. My 89 had the factory barrier coat which was gray in color, I was able to powerwash the old paint off with a serious powerwasher and then use VC17m. The time saved by using VC17 is astounding and every year from then on is a trivial event. From this... to this to this
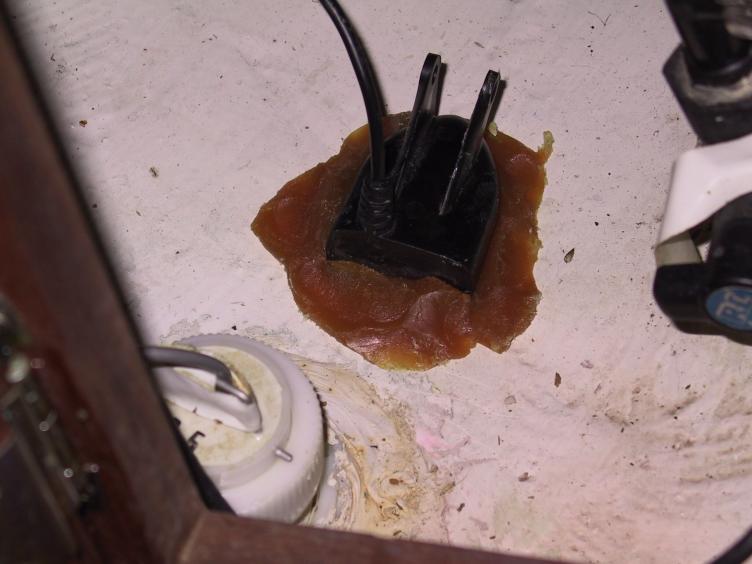
A number of us have had success using a toilet bowl wax ring, removing a glob of it and slapping it down next to the existing transducer locations. Then take the new transducer and smoosh it in. Then take some of the excess and ovelap the edges the transducer.
The benefit of trying this approach is that if you do not receive a signal, then just try another location. You cannot do that if you follow what some mfrs rcmd - epoxying it in.
I find the signal great and has never faulted in over 2 years.
Larry - Just so I get it, are you saying that the transducer is mounted (gooped using the wax) onto the inside of the hull next to the current transducer, and it accurately shoots through the fiber glass hull AND the 16 coats of antifouling paint?
I've done this with my portable fishfinder in my kayak, but it's made out of recycled coke bottles and 1 gal milk jugs.
The ability to shoot through the hull is truly a very beautiful thing indeed, especially because today, when I was trying to find a convenient spot on the transom for the new depth sounding transducer, I really was not satisfied with simply screwing the bracket into the glass.
At least my vintage '89 Catalina has solid fiberglass in that location and whatever bottom paint layers there are on it, they are intact. Though, past owners may have used ablative paint and I have continued using something similar, copolymer paint. But they both have in common is that they gradually shed the coating so there is not as big a buildup of paint after a few seasons and very little if any sanding required. But others have had success using the toilet bowl wax ring method. You probably could do a search and find some of the others that have done it as well.
As long as there are no bubbles between the transducer and the outer hull surface/paint, then the ultrasonic signal will get thru and transmit back okay. Awhile back when I was looking into which fishfinder to buy, I recall seeing some info that inside hull mounting is okay as long as no bubbles present and should work but may not be able to shoot down to mfrs advertised depth limit for the fishfinder/depthfinder. But some of these fishfinders shoot down 1000 ft...so if it only shoots down say 400 ft, that is no big deal. On the Potomac, I am dealing with depths mostly 50' or less.
I checked out my fishfinder by sailing the first few times with the transducer mounted on a stick off the transom. Then after I got used to it's performance that way, I then mounted it inside the hull with the toilet bowl wax glob. I noticed no abnormalities/inaccuracies in the readings from hanging it off the transom to mounting it inside the hull.
The only perhaps inaccuracy is......and this would be common to everyone unless someone actually adjusted their fishfinder/depthfinder for this ----- where you mount the transducer and either inside or thru-hull, that location is probably about 1 foot or so below the waterline. So...when my fishfinder is reading 4 ft, it is probably closer to 5 ft to the waterline. I know my fishfinder is set to read a bit conservative because I have stuck my hook-pole over the side and measured the length underwater. But I have left my fishfinder set that way because it is sort of a safety against weed grass, and debris that may be down there.
By the way...I am leaving around 1pm or so today for a 3 day training class near Philadelphia, PA. I may not have website access and will be back Wednesday night.
Bruce - I recently mounted my fishfinder in almost the exact same location as Larry and I used the toilet bowl wax just as he did. I hung my transducer over the side of the boat just before mounting inside and I got the same readings inside and out so I wouldn't be too concerned about the accuracy using this method. That is as long as your boat is not cored.
Greg - I mounted my transducer under the forward berth just to the right of the centerline of the boat and next to the old SR Marine depth transducer that came with the boat.
One advantage of using this method is you can tilt the transducer in the wax so that it's reading straight down and not slightly off to one side.
I've been looking for a set of 4" inspection port <i>without</i> thumb indentations - a plain, flat cover - but I haven't been able to find them. Checked the usuals: BoatUS, West Marine, etc.
I measured the existing instruments, and the diameter is 5". The inspection ports are typically 5.125 or 5.25 inches.
I thought West Marine sells Beckson and/or Nicro 4" & 5" ports/vents. I believe the Beckson one has an optional net pocket insert and then the Vent Cover goes over it. The port/vent flange for attaching screws, etc is probably around a 5" diameter bolt circle. I see that a number of them have thumb indentations but half-way down the page, there is a Nicro cover that looks like it may be a plain flat cover type - Nicro Snap-In Deck Plates. This Nocro Plate appears to come in a 4" hole size w/outside flange diameter of 6". I suspect the screw/bolt holes are around 5" diameter. If you do not want to drill holes, I guess you could silcone seal the unit in and forgeddabout the screw holes.
One reason I used a scroll saw and cut my own circular cover was that I did not want to drill holes thru the bulkhead with a wider custom made circle or using a vent cap. All the holes that attach my Starboard circle to the bulkhead pass thru the original 4" hole. The bolts pass thru the original circle and mount to the Starboard mounting board inside the cabin. No holes were drilled thru the companionway bulkhead.
Notice: The advice given on this site is based upon individual or quoted experience, yours may differ. The Officers, Staff and members of this site only provide information based upon the concept that anyone utilizing this information does so at their own risk and holds harmless all contributors to this site.