Notice:
The advice given on this site is based upon individual or quoted experience, yours may differ.
The Officers, Staff and members of this site only provide information based upon the concept that anyone utilizing this information does so at their own risk and holds harmless all contributors to this site.
This is the first time working with Starboard. Two questions:
1. What sealant have people used to seal it to the bulkhead and/or other surfaces (or gel-coat)? The package lists a "glue" or sealant to use but does regular 4200 or other types work too?
2. Is there anything you can do to stop the "shedding" it does where you cut it? I am trying to make a round cover and it sheds like spun fiberglass. Heat/melt it?
I believe you can use 4200 or 5200 for sealing but the piece must be mechanically attached (screws). No regular adhesive will work. From the Starboard web site:
"StarBoard can not be glued using standard adhesives. Products like 3M's 5200 work well as a water sealing caulk but will not adhere StarBoard to itself or other materials in a permanent bond."
I have not had it shed like you describe. It makes a snowy white mess of my shop. What are you using to cut it. I have cut it with my table saw and then run it through the router. All I needed to do after was a little finish sanding of the edges.
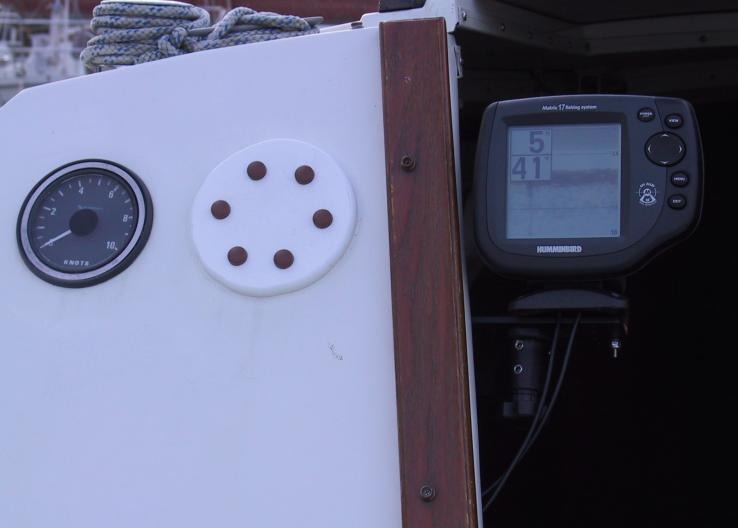
I used a scroll saw to cut a round cover as part of my fishfinder project. The Starboard round cover was bolted over the depthfinder hole to a Starboard support board inside the cabin used also for mounting the RAM Swing Arm for the fishfinder. Below is a photo of the round cover. My website has other photos including the inside mounting board. I ahve also use the Starboard as a mounting board between the transom and the outboard motor bracket. In these installations, 3m 4200 was used more as a sealant than anything else. Bolting is what really secures the Starboard.
I have used a radial arm saw with a blade for cutting soft/plastic type matls to make straight cuts. The white stuff does fly off quite a bit. But the best saw for shape cutting is using a scroll saw. That is what i used to make the round cover and and the mounting board. I bought the scroll sqaw at Sears. if not familiar with a scroll saw, it has a small platform of about 8-10" wide/circular and it uses a small, thin blade similar to that used in a hand held saws but the scroll saw's motor moves the blade up and down to make the cuts. You can adjust the speed of the saw. It makes a lot less mess and it cuts shapes very well since the blade allows the work to be turned as you do the cutting. I then beveled the edge of the shaped boards using a router bit on my accessory side of my radial arm saw.
I cut it as close to the round shape I could then drilled a hole in the center. I mounted it on my grinder then "turned" it like on a lathe. I used files to rough cut it then finer and finer sand paper. It allowed me to cut down the inside edge to create a lip so the plate would then sit centered "inside" the bulkhead hole. Then I beveled the outside edge. I just need to take it to my father Inlaw's drill press to cut the 2" hole for the depth sounder.
I'm thinking of starting over though. If I cut a larger and deeper center hole I can maybe get the depth sounder to sit "embedded" into the piece a little. Then a standard instrument cover from the old knotmeter would cover the plate and the depth sounder. I beveled the this one too much so the old instrument cover won't catch the edge of the new plate.
I agree with everyone above... Cut it to rough shape, and then use rasps, sanders, hand-sanding, or any other wood tools--it works like very hard Ivory Soap. But too much speed with electic tools can cause melting, which generally isn't desirable.
Notice: The advice given on this site is based upon individual or quoted experience, yours may differ. The Officers, Staff and members of this site only provide information based upon the concept that anyone utilizing this information does so at their own risk and holds harmless all contributors to this site.