Notice:
The advice given on this site is based upon individual or quoted experience, yours may differ.
The Officers, Staff and members of this site only provide information based upon the concept that anyone utilizing this information does so at their own risk and holds harmless all contributors to this site.
you may hate this idea, but at least give me points for being creative with a problem.
SWMBO isn't a fan of climbing th eladder into the boat after a swim. She says its hard to get up onto it, and unnatural to try and clamber over the stern rail.
I think the stern rail part can be solved with a cutting torch and the right fittings, but getting onto the ladder is another ball of wax.
Last summer we borrowed an inflateable that some friends had for a trip over to the beach. just for a lark we pulled it behind the boat with Chuck in it. Chuck thought it was great fun, and when we got to the beach, SWMBO and Chuck both swam off the inflateable, and lounged around on it when they weren't swimming. They both thought it was great.
Now that was one of these 3 seater deals with a "hole" for each rider. Not really practical for what we used it for, but it worked fine and saved the girls from having to climb up and down the ladder.
Does anyone have one of these, or something similar, and have you tried to use it as a swim platform/lounge? I'd love to hear other ideas since I don't have 500 canuck-bucks to throw at this.
We have boarding ladder that clips into mounts on the port and starboard sides of the cockpit. It's deeper, more comfortable on the feet, and much easier to board. I just checked WM and Defender and didn't see it, so I don't know where you get them now.
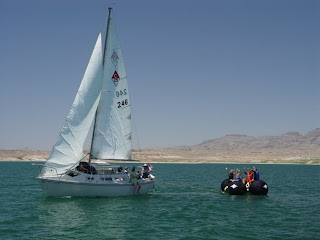
By accident, we ended up towing the kids on a big inflatable around Lake Mead last year. Granted, it wasn't the exhilarating splendor they experienced when the thing was towed behind my brother's ski boat, but it had the great advantage of acting like a sea anchor, which could come in handy some day.
Of course the conditions in which you need a sea anchor are the very best ones to put your kids out on an inflatable in. Especially if they ate all the cookies or spilled your beer...
In the name of full disclosure, I have to admit that I was not intentionally hove to. I was just too busy to switch the jib over after the tack!
We had sailed in a circle around the accompanying powerboat about 6 times waiting for the kids to swim back and forth to the tube. On the last circle, the kids threw us the line, this picture was taken from the stinkpot just after we had tied the tube to our stern.
Whoww that looks grate. Would sure make climming into the cockpit a lot easer. But would it hold up to the 250 pounder? have you tested it and if needed how would inprove it. grate up grade.
We have tested it but not at 250. I'm about 165 and it works for me. It is reinforced inside the transom and has 4 points of contact vs 2.
I hated the OEM ladder every time I had to stand on it. Even with the upgraded rung steps from Direct it was still uncomfortable. With the swim platform you can more comfortably climb over the pushpit and not have to struggle to find the ladder. The First Mate likes the extra depth in the water.
<font color="green"><font size="3"><font face="Comic Sans MS"><i>No problem John, all parts were purchased at West Marine.</i></font id="Comic Sans MS"></font id="size3"></font id="green">
<font size="3"><i><font color="green"><font face="Comic Sans MS">OEM ladder w/ Catalina Direct steps installed:</font id="Comic Sans MS"></font id="green"></i></font id="size3">
<font size="3"><font color="green"><i><font face="Comic Sans MS">Current West Marine Setup Extended. We get a bit more depth in the water vs. the OEM ladder. </font id="Comic Sans MS"></i></font id="green"></font id="size3">
<font size="3"><i><i><i><font color="green"><font face="Comic Sans MS">Current West Marine Setup Stowed. </font id="Comic Sans MS"></font id="green"></i></i></i></font id="size3">
<i><font color="green"><font size="3"><font face="Comic Sans MS">This is the platform. Notice we went with the teak in the I/O style. Two grab points vs. one is nice. The teak was finished as all other brightwork with Cetol light & clear. These shots don't show it but we have several non skid strips on top for wet grippage.</font id="Comic Sans MS"></font id="size3"></font id="green"></i>
<font color="green"><font size="3"><font face="Comic Sans MS">This is the ladder we purchased</font id="Comic Sans MS"></font id="size3"></font id="green">
<font color="green"><font size="3"><font face="Comic Sans MS"><i>Here's the transom with the OEM ladder removed. Can you see the stress cracks?</i></font id="Comic Sans MS"></font id="size3"></font id="green">
<font color="green"><font size="3"><font face="Comic Sans MS"><i>Here's the transom after grinding and sanding.</i></font id="Comic Sans MS"></font id="size3"></font id="green">
<font color="green"><font size="3"><font face="Comic Sans MS"><i>Here's the initial fill work. All West Systems products used. </i></font id="Comic Sans MS"></font id="size3"></font id="green">
<font color="green"><font size="3"><font face="Comic Sans MS"><i>Ready for the gelcoat!</i></font id="Comic Sans MS"></font id="size3"></font id="green">
<font color="green"><font size="3"><font face="Comic Sans MS"><i>Gelcoat shot. Time to wetsand & buff. Backing plates to install and holes to be drilled next.</i></font id="Comic Sans MS"></font id="size3"></font id="green">
<font color="green"><font size="3"><font face="Comic Sans MS"><i>Finally installed. And yes, that is Homer greeting you as you climb up</i></font id="Comic Sans MS"></font id="size3"></font id="green">
<font color="green"><font size="3"><font face="Comic Sans MS"><i>Well, there it is in nutshell. It wasn't an overnight project but it was well worth the effort. Several people thought that this setup would interfere with the rudder but with proper planning and placement this is not the case.</i></font id="Comic Sans MS"></font id="size3"></font id="green">
Thanks Randy. I used a HVLP gun and re-tipped for the thicker gelcoat. Sorry, I don't remember what size but I do remember I had to experiment to find the right tip. Also there was some experimenting & tinting with the gelcoat to get the right shade. (On an '84 it ain't white ) I am told there are other ways to lay the gelcoat but I chose the slickest method that would involve the least amount of after-work. With this method the wet sanding and buffing was minimal and the results were (IMO) right on.
The best thing I ever did to make the climb easier was to wrap the rungs with large soft line. The line was expensive but it sure is easier on the feets.
I recently bought the biggest container of gelcoat they sold from wm intending to spray it... it was thick like gel and unsprayable. What supplier do you use for gelcoat and what brand is it?
Notice: The advice given on this site is based upon individual or quoted experience, yours may differ. The Officers, Staff and members of this site only provide information based upon the concept that anyone utilizing this information does so at their own risk and holds harmless all contributors to this site.