Catalina - Capri - 25s International Assocaition Logo(2006)  
Assn Members Area · Join
Association Forum
Association Forum
Home | Profile | Register | Active Topics | Forum Users | Search | FAQ
Username:
Password:
Save Password
Forgot your Password?

 All Forums
 Catalina/Capri 25/250 Sailor's Forums
 Catalina 250 Specific Forum
 Plastic pin at end of boom?
 New Topic  Topic Locked
 Printer Friendly
Author Previous Topic Topic Next Topic  

TakeFive
Master Marine Consultant

Member Avatar

2269 Posts

Initially Posted - 06/13/2010 :  16:33:40  Show Profile
Yesterday my reefing line and topping lift got fouled around the end of the boom. It appears that this happened for two reasons. First, there is a flat plastic piece between the sheaves that maintains separation between the two that looks like it may be broken. Also it looks like there must have been a plastic pin that went across the end of the boom that is also broken. It looks like both of these help prevent these lines from jumping out of their respective sheaves.

The flat plastic piece could be a lot of trouble to replace, but the plastic pin looks relatively straightforward. Have any of you found a place to replace this?

Rick S., Swarthmore, PA
PO of Take Five, 1998 Catalina 250WK #348 (relocated to Baltimore's Inner Harbor)
New owner of 2001 Catalina 34MkII #1535 Breakin' Away (at Rock Hall Landing Marina)

Edited by - on

Nautiduck
Master Marine Consultant

Members Avatar

USA
3704 Posts

Response Posted - 06/13/2010 :  20:39:24  Show Profile
I replaced the pin with a small plastic wire tie. Just looped it through the holes. Has been there for over two seasons now and works fine. For the other piece you can call Catalina, ask for the Florida plant and then ask for the Parts Department. They are quite responsive.


Edited by - on
Go to Top of Page

TakeFive
Master Marine Consultant

Members Avatar

2269 Posts

Response Posted - 06/15/2010 :  18:59:34  Show Profile
<blockquote id="quote"><font size="1" face="Verdana, Arial, Helvetica" id="quote">quote:<hr height="1" noshade id="quote"><i>Originally posted by Nautiduck</i>
<br />I replaced the pin with a small plastic wire tie. Just looped it through the holes. Has been there for over two seasons now and works fine. For the other piece you can call Catalina, ask for the Florida plant and then ask for the Parts Department. They are quite responsive.


<hr height="1" noshade id="quote"></font id="quote"></blockquote id="quote">
Nice pic! I have unrelated question about your reefing setup. It looks from your pic like you have blocks to reduce friction in your jiffy reef. I have no experience spec'ing or buying blocks, and they're expensive little buggers. So I want to make sure I get the right ones. What is the size/design of the blocks you bought for this? And how do you attach it? Is it just a loop in the block through the cringle, then a large SS cotter ring on the other side? Of does the cotter ring risk snagging the sail? Are there other considerations to ensure best performance and minimum chafe?

Edited by - on
Go to Top of Page

Nautiduck
Master Marine Consultant

Members Avatar

USA
3704 Posts

Response Posted - 06/15/2010 :  19:51:27  Show Profile
It is a Ronstan RF30100 mini block. I have a 3/4" ring that is on the other side of the cringle that the block attaches to. The ring is small enough to go part way through the cringle for attachment of the block but too large to go all the way through. This setup makes setting the reef easier due to lessened friction. We use two line reefing which I highly recommend.

Edited by - on
Go to Top of Page

TakeFive
Master Marine Consultant

Members Avatar

2269 Posts

Response Posted - 06/15/2010 :  20:25:23  Show Profile
<blockquote id="quote"><font size="1" face="Verdana, Arial, Helvetica" id="quote">quote:<hr height="1" noshade id="quote"><i>Originally posted by Nautiduck</i>
<br />It is a Ronstan RF30100 mini block. I have a 3/4" ring that is on the other side of the cringle that the block attaches to. The ring is small enough to go part way through the cringle for attachment of the block but too large to go all the way through. This setup makes setting the reef easier due to lessened friction. We use two line reefing which I highly recommend.
<hr height="1" noshade id="quote"></font id="quote"></blockquote id="quote">
Thanks for the tip.

For now I am still using single-line. The previous owner had a unusable setup (I think he pulled it out and couldn't figure out how to re-rig it). He had the boat for less than a couple months, and didn't seem to know anything about how to sail the thing. As a default starting point, I re-rigged the single line more or less how Catalina specified, except I used a block at the base of the mast instead of the tiny, poorly aligned cheek block on the mast. That has helped to relieve some of the friction. However, since my jib halyard is totally unused, I could use the port clutch to do a second line from the cockpit.

I need to review all the prior threads on this topic, now that I've got enough experience with reefing to appreciate some of the nuances. But I'm curious if/how you do a second reef. I have cringles in the sail, but they're not rigged. Part of me says that if I'm in a hard enough blow to need the second reef, I should drop the main and use a partially furled jib, or just motor in.

Edited by - on
Go to Top of Page

Nautiduck
Master Marine Consultant

Members Avatar

USA
3704 Posts

Response Posted - 06/15/2010 :  21:02:04  Show Profile
I just have the two line single reef. If it gets to a point where I need to have less sail than that I just douse the main and go on a furled genny.

Here's a shot of that block when reefed.


Edited by - Nautiduck on 06/15/2010 21:08:29
Go to Top of Page

ruachwrights
Captain

Members Avatar

USA
258 Posts

Response Posted - 06/21/2010 :  11:00:37  Show Profile  Visit ruachwrights's Homepage
When I purchased our boat the little rolling block at the end of the boom had fallen out. In the hole that was there, I used to put a filed, clipped nail with the end folded over in order to clip the stay cable attached to the back stay to the boom. At end of last year I noticed that the line threaded through boom and back up to the mast at the acute angle had begun to fray because it was just resting on the metal of the boom. This year I have attached a pulley roller to the nail in order to reduce the strain on the line. I have used my modified nail to be the axel.

Aft of this hole, I also have that plastic thingy which had been severed. My thought was that this was what was originally supposed to be used for the backstay boom securing system. Since I am now using spare room on the axle of my new pulley roller to clip onto when sail not in use, I would wish to put something more substantial in the place of where that plastic thing is to use to secure the boom when not in use.

I realize that my techniques are of the bozo-low budget variety, but they do get the job done.

Vern

Edited by - on
Go to Top of Page

pem
Deckhand

Members Avatar

USA
6 Posts

Response Posted - 06/22/2010 :  08:15:44  Show Profile
I just recently purchased a 1999 WK and one of the previous owners had replaced the plastic pin with a drill bit! I did not think that was such a good idea for a replacement, so I removed it. It had been in there so long that it had gotten brittle. I took a piece to the hardware store with me and found a small bolt (4mm x 50mm), a cap nut, and a spacer (1" long) that should fit. I have not made it back out to the boat yet to try it out, but I should be out there Friday and will report back.

Edited by - on
Go to Top of Page

Nautiduck
Master Marine Consultant

Members Avatar

USA
3704 Posts

Response Posted - 06/22/2010 :  13:00:43  Show Profile
<blockquote id="quote"><font size="1" face="Verdana, Arial, Helvetica" id="quote">quote:<hr height="1" noshade id="quote"><i>Originally posted by pem</i>
<br />I just recently purchased a 1999 WK and one of the previous owners had replaced the plastic pin with a drill bit! I did not think that was such a good idea for a replacement, so I removed it. It had been in there so long that it had gotten brittle. I took a piece to the hardware store with me and found a small bolt (4mm x 50mm), a cap nut, and a spacer (1" long) that should fit. I have not made it back out to the boat yet to try it out, but I should be out there Friday and will report back.
<hr height="1" noshade id="quote"></font id="quote"></blockquote id="quote">
Sounds like a good solution. Let us know how it goes and post a photo of the result.

Edited by - on
Go to Top of Page

pem
Deckhand

Members Avatar

USA
6 Posts

Response Posted - 07/09/2010 :  11:47:34  Show Profile
Well, I was a little off in my original rough measurements of what the bolt and spacer should be. Here is a picture:


As you can see the bolt is too short to get the nut on and the spacer was not quite long enough to eliminate the gaps. So, back to Home Depot I went. The selection of stainless steel bolts is a little limited, so I tried a 2 1/2 inch #10 bolt and it was a little long and a little more snug in the hole (no picture this time) and they did not have a spacer that was 1 1/8" long. Rather than continuing my search for the correct sized hardware, I just put a plastic coated wire tie through the hole and called it good enough.

In case anyone wants to try this approach, it looks like about 2 1/4" long is the correct size for the bolt. A #10 bolt will fit through the hole with a little work (I could not find any #8 bolts or metric equivalents that were longer than 2"). The spacer needs to be about 1 1/8".

Edited by - on
Go to Top of Page

TakeFive
Master Marine Consultant

Members Avatar

2269 Posts

Response Posted - 07/24/2010 :  21:20:49  Show Profile
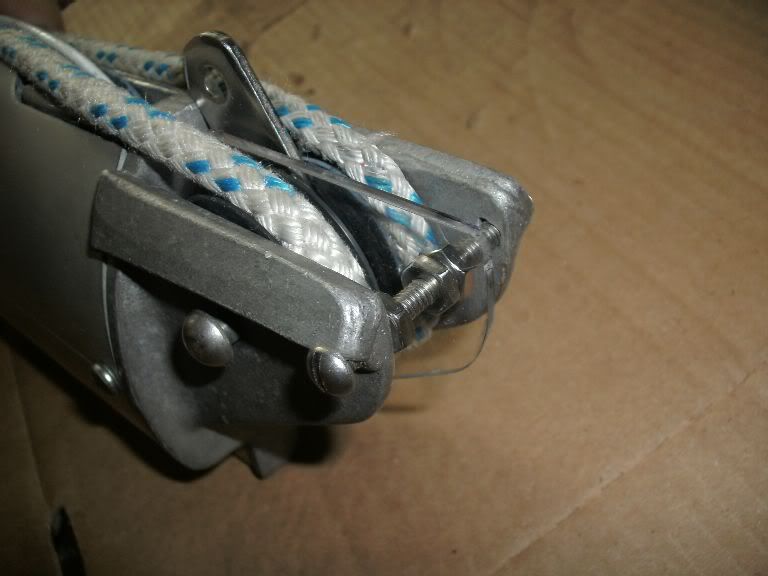
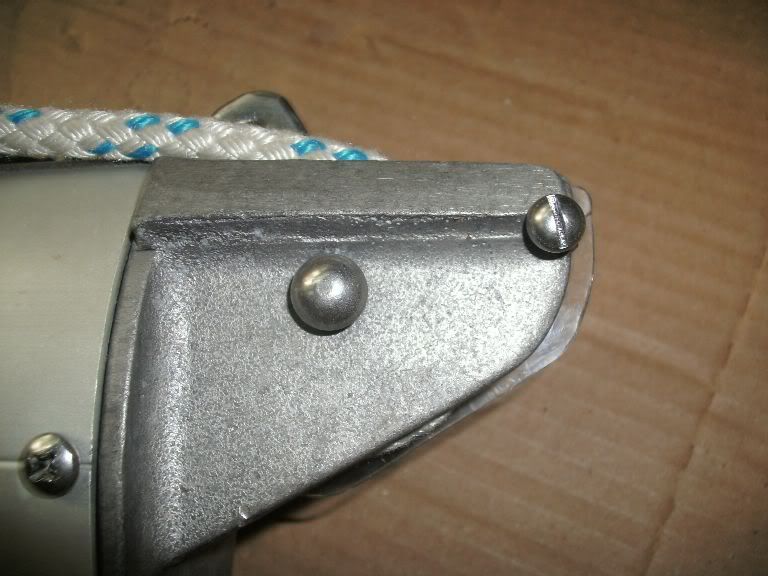
Since I had the boom off the boat to replace the forward sheaves and shaft, I went ahead and restored the other end also. I drilled out the remnants of the plastic pin, fabricated a new plastic separator to keep the lines from jumping the sheaves (acrylic was the only UV resistant material that I could find with no notice), and replaced the missing plastic pin with a 10-24 x 2" bolt. You can see that rather than attach a nut at the end of the bolt, I cut it so it would not stick out and used a lock nut up against the head instead. The two nuts holding the acrylic separator in place have since been replaced with nylon nuts.

Since I have no idea what the original plastic separator looked like, I was guessing on its shape. If any of you have a nearly-new boat with an unbroken separator, please post a pic for comparison.

<center>

</center>

Edited by - TakeFive on 07/24/2010 21:55:42
Go to Top of Page

Nautiduck
Master Marine Consultant

Members Avatar

USA
3704 Posts

Response Posted - 07/25/2010 :  19:36:11  Show Profile
Nice job! I don't know if our boom ever had a separator between the sheaves. Using a lock nut on the inside rather than a nut on the outside was a very nice move.

Edited by - on
Go to Top of Page
  Previous Topic Topic Next Topic  
 New Topic  Topic Locked
 Printer Friendly
Jump To:
Association Forum © since 1999 Catalina Capri 25s International Association Go To Top Of Page
Powered By: Snitz Forums 2000 Version 3.4.06
Notice: The advice given on this site is based upon individual or quoted experience, yours may differ.
The Officers, Staff and members of this site only provide information based upon the concept that anyone utilizing this information does so at their own risk and holds harmless all contributors to this site.