Notice:
The advice given on this site is based upon individual or quoted experience, yours may differ.
The Officers, Staff and members of this site only provide information based upon the concept that anyone utilizing this information does so at their own risk and holds harmless all contributors to this site.
In an earlier posting thread, I mentioned I had cracked the port side forward main cabin port/window probably when I was readjusting the stays. The port/window does not leak but I am going to put a bead of silicone sealant inside and outside along the crack to ensure no leakage. I may leave it at that but wanted to explore replacing this port/window.
Apparently, "Catalina Yachts" will offer the replacement but believe not for those with earlier boats having an aluminum channel on the perimeter of it. My port/window is just the acrylic/Lexan tinted with screws and sealant sealing it. Catalina Parts Dept is mailing me the replacement. The cost was $37.37.
"Catalina Direct" has good info regarding the sealant to use and history of what Catalina did thru the years. My vintage, the port/window has screws and sealant but later years, they found that the sealant formed such a tight bond that the screws were not needed so they only used the black sealant. This also eliminates potential stress points without using screws. So, if I replace the window which will not be to next fall or so (after this main sailing season), I plan not use the screws also saving me the trouble of drilling the holes in just the right spots which chances are would not be dead on anyway - requiring epoxying the old holes and redrilling thru the fiberglass.
Just received an EMail from Catalina Yachts Technical Division and they indicated the Dow sealant that is used by Catalina and that I could also buy that thru their Parts Department. It's $10 plus change which is perhaps $2 cheaper than what Catalina Direct is selling it for presently. But what I wanted to mention mainly is that Catalina Yachts was also kind enough to forward the Catalina installation drawings. When I get home, I plan to load those drawings up to this posting for reference info for others.
Well...the order was already placed with Catalina Yachts and I discussed the sealant with them today and ordered that as well. Anyway, nice to know you can support for some items directly with the manufacturer. Kind of makes my boat feel younger. Also a great selling point that we have catalina direct and Catalina Yachts to support our boats.
Also, I know there must be places to get some of these things made locally but there does not seem to be a plentiful supply of manufactuers around my area in northern virginia - This was story with the mattress I needed custom made for my bunk extension. I wound up ordering that online from Knox Foam. On the other hand, when it comes to sails - Annapolis, MD is about 1 - 1 1/2 hrs away and they have the major lofts located there for support besides at least one non-major small sailmaker located locally in our area.
Frank, The Catalina work crew must have taken long coffee breaks and extended vacations while building your boat. That is the only explanation I could think of as to why your boat's windows have screws like mine if Gary's 5862 did not have them !
I wanted to put the window installation drawings Catalina forwarded to me into this posting or at least onto my website and then link it but i am not sure right now how to do that. They sent it as a .pdf files. Then when got home, my home PC launched it into MS Word. I know how to insert a picture into my website/here but my first attempts to load it onto my website did not work. I can EMail them if anyone wants to try but so far I am having no luck.
I would try to copy the photo and paste it into a blank new document in a photo editor, and saving it as a jpeg. Most photo editors will look at the clipboard when opening and size a new document to the file on the clipboard. I use Photoshop.
I have ordered the window and sealant. I plan on putting a bead of silicone on the thin crack inside and outside of the cabin and then leave the replacement for possible Fall season project.
I replaced two cracked windows on my 78, no issues at all, got the glass from a local glass shop, (safety of course) and the stainless sheet metal screws at my local lowes home center, , they have dow, 3m sealant as well, it was about an hour job, they look as good as factory,
I am curious as to when you replaced your windows with "glass" obtained locally...My windows are made of a plexiglass or acrylic/Lexan matl w/slight tint. Are yours made of glass ? and is there a tint in the original windows and you matched that with the replacements windows or there was no tint that you had to match it with ?
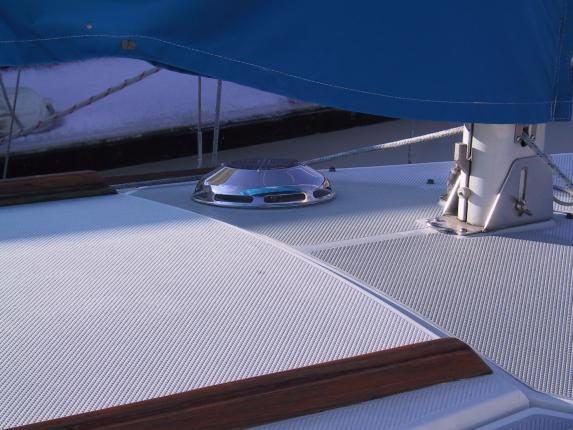
In answer to what is the shiny thing on my deck just ahead of my mast......I think what you are looking at is in my opening photo to my website and at the angle the photo is taken the shiny thing looks like it is in front of my mast but it actually is a Nicro Solar Vent that I installed into an existing vent that had a cover on it when I bought the boat from the PO. It is just behind the mast on the port side. It is located in the forward part of the main cabin. There are some addl photos of it in my Interior & Exterior Section of my website. But here is an exterior close-up to see if this is what you are talking about. When I saw the vent cover ...I took the dimension of it and noticed it also had Nicro stamped on the plastic inside flange. So I went and bought the Nicro solar vent and it fit perfectly - snug fit. Talk about an easy project !!
Just an FYI that in 2005 I replaced my "smoked" windows through Cruising Concepts. I sent them one side of the old windows so they could create a template for future Catalina 25s. My cost was about $325 "then". No idea now. It included sealant, screws, and windows for both sides. He did say he was giving me a deal because I was willing to send him the old windows to create a template.
They should still have the template on hand. It may be worth a shot to compare prices or let them haggle with other suppliers??
The hardest part was removing the old windows. That original sealant was strong stuff.
For the record mine has the screws. (5878) Black (I assume SS??).
I'd like to find a local boat with the laxan windows to see how they are different than the aluminium framed ones. I don't think it would be too hard to accomplish once the lexan is in hand. Scooter, what does the inside look like now? Did you trim the frames out with anything or is it not needed?
You will definitely need to find some kind of trim. The channel frames cover rough cut openings through the cabin and liner with an irregular gap between the inner and outer laminates. Properly sealed, the channel system should be good at least as long as the glued on system. It comes down to aesthetics, not function - traditional or modern/euro, whichever you prefer.
I've been dreaming up ideas to replace the aluminum frames in my 1980 Cat. 25. The frames are such a mess, and leak like a sieve.
I'm surprised at some of this information, especially to see that the sealant alone is strong enough to hold a watertight bond. So, if this is the case, would a trim around the interior be all for aesthetics?
<blockquote id="quote"><font size="1" face="Verdana, Arial, Helvetica" id="quote">quote:<hr height="1" noshade id="quote"> Just noticed the post that shows the prices from CC. That's steep!!! <hr height="1" noshade id="quote"></font id="quote"></blockquote id="quote">
<font size="2">Yes it seems high, but remember that is for <i>all</i> six windows. Both forward windows are opening ports which do cost quite a bit more. This kit comes with a trim ring to finish the edge of the hole also. I am replacing all of my lights with Plexiglas and replacing both forward opening ports for a lot less money. The plexy is about $90.00 for 4x8 sheet, which is enough to do it twice. Each opening port was $200.00. So almost $600.00'l get-r-done. </font id="size2">
<blockquote id="quote"><font size="1" face="Verdana, Arial, Helvetica" id="quote">quote:<hr height="1" noshade id="quote">So, if this is the case, would a trim around the interior be all for aesthetics?<hr height="1" noshade id="quote"></font id="quote"></blockquote id="quote">
<font size="2">If you glue Plexiglas to the outside of the hull, the inside piece is only for trim. I finished the inside of the hole with epoxy and made it perfectly smooth and gel coated it. I had to replace all of the core in the cabin sides so it was a monumental project. Hopefully, no one here will have to do it.
After I replaced the core wood, I under cut the plywood below the surface of the opening.
Then I filled the groove with thickened goo to seal the core.
All sanded and gelcoat sprayed on the edge.
So you can see, I'm not going to install a trim ring inside.</font id="size2">
HappyD First off, that looks fantastic. You did a nice job.
I'm pretty sure I'm going to have to replace/repair the core.
My windows have leaked for a long time. I got the Window Re-Seal Kit from CD. When I took the aluminum frames out, 1/8 inch thick pieces of plywood pretty much just fell out.
I used epoxy to try to repair this, but I don't think I did the trick. In fact, I think this is one of the reasons the windows still leak.
Could you explain to me the process you used to replace the wood core?
I'm not sure if I would gelcoat finish the trim like you did, or just get it solid and then add a trim. Either way, I think I need to improve the situation with the wood core around the windows.
Matt. I just found out that I have web space on the new server so I'll be uploading my web pages again. I have this page done 1/2 way and I'll fix all the broken links as soon as I can.
HappyD Thanks for the link. I just took a quick look, and yeah... mine kind of looks like the picture you have with the pencil coming out of between the linings.
"Huge". "Monumental". Not the words I'm looking for here. "Quick". "Easy" would be more like it. Another reality check I guess.
**Edit: I just read through the page. If i could ask a couple questions:
It looks like the Plywood you used is very thin... like 1/8" or so. Is that true? If so, then you had what... 1/8" or more of epoxy on each side of the plywood core?
Also, you mention "...gelcoat doesn't go on epoxy..." Why not? What are the alternatives.
Notice: The advice given on this site is based upon individual or quoted experience, yours may differ. The Officers, Staff and members of this site only provide information based upon the concept that anyone utilizing this information does so at their own risk and holds harmless all contributors to this site.