Notice:
The advice given on this site is based upon individual or quoted experience, yours may differ.
The Officers, Staff and members of this site only provide information based upon the concept that anyone utilizing this information does so at their own risk and holds harmless all contributors to this site.
A long while back I remember someone posting about a DIY design for a folding table in the cabin, with, um "fiddles"? (I think this is a lip added to the edge of the table to keep things from sliding off- very nautical, and practical, if you are eating underway.) Someone referred to such a post by Oscar. Did anyone save this? The archives seem to go back only to 2006.
Arlyn, just saw your post from 11/2006 referring to your table with fiddles on top when folded, but link did not work. Can you still post the info and pix? Thanks!
Fred... yes, I roughly recall Oscar's table. I'm almost sure a pic of it was included in a Mainsheet article and I had an archive of all that I submitted but it was lost in a hard drive crash.
If I recall, his table had drop leaves and a box with drawer fastened to the table. Drop leaves are not very workable with fiddles and I don't think his table had them.
His table did use the Catalina mounts and if I recall could be removed from the mounts and stored on the head side of the head door. I'm trying to recall how that worked out with the drawer as I think the drawer was attached to the table.
Hail Oscar on the general forum or past members forum.
The many variations of tables that have been built is one of the most interesting topics detailed on the c250 forum. Looking forward to seeing yours.
While it is not custom built I used an AFI table as the start and made a simple mod to make it into the cabin table. Here is the link. I updated the photos to re size them and that made the thread re-appear in the forum.
Fred, you outlined that fiddles were one of your design requirements and they could easily be added (for folded position) to the table that Randy used.
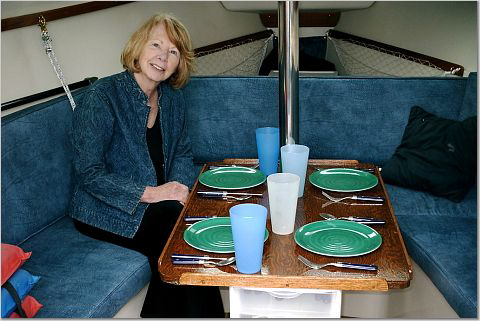
I got inspired by all the other table mods on this site, so I did one for my boat. I just went with a basic pre-made table top from Lowes, some trim pieces from Lowes, and some hardware from Rockler (used the existing table leg and receiver). I got about $60.00 into this table. Applied three coats of stain/poly. Finished dimensions are 24"L x 16"W (closed) and 24"L x 32"W (opened). It fits nice and gives me more room to move around the cabin when closed - opens up to make a nice table top when dining. Here are a couple photos:
Yes, that table for $60 is fantastic! I think even I could build one like that... The hinges and other hardware from Rockler's, are they online?
Arlyn, I was able to find older posts, just by checking the "archive" box in the search. Computer ineptness...I'm grateful to William for the new pix 'cos I can't open the photos in the older posts. Probably more of the same (ineptness)...The stain and ploy look great, don't they? See, I will never have any spare teak lying around, and I'll have to enlist a well-tooled (sorry) friend to help me.
John, I used [url="http://www.rockler.com/product.cfm?Offerings_ID=1182&TabSelect=Details"]Twin Pin Sewing Machine Hinges[/url]. This allows them to fold over 180 degrees when you fold the table leaves. They are also flat when the table is open so the table is smooth with no hinge pin sticking up.
I also have one of these [url="http://www.rockler.com/product.cfm?page=2319&filter=table%20leaf%20support"]table supports[/url] for each leaf on bottom side of table for additional support. I have kids and didn't want only hinges holding up the table leaves. Note: they slid in and out too easily, so I wrapped a piece of electrical tape around the sliding part where it enters the stationary part. This gives it a little "friction" to hold it from sliding out (ie. when boat heals). When table leaves are open the sliding part touches the wood, stays in place and supports the leaf. The tape also provides padding and protects the wood when they are pulled out.
You anticipated my next question...so these supoorts are what slides out through the notches cut in the fiddles? Very nice. Any other details for the underside of the table? Is the post near enough to the middle to support the far end? Thanks!
Fred, Yes on the table supports. I don't have any photos of the bottom of table. Could take some next time at boat. There is plenty of support at the aft end of the table. I used the stock tube and receiver (took it off of the stock table). The stock hardware has pretty good "heft" to it. The receive is a located a couple inches back or so from the front of table. I just measured back from the stock table to locate receiver (from the hole in table the mast compresion post goes through).
You loose the part of the stock table that goes in front of the mast compresion post. But, being able to get around the table makes up for this little bit of lost table space.
If you're going to use brass screws, an easy way to keep them in nice condition is to pre-thread the holes with a SS screw of the same size. The SS will stand up better to the torque from your screwdriver, and once the wood is threaded, you can easily put the brass screws in.
David... The description of the butlers hinges says that they are a 90 degree hinge so I don't think they would work. The two pin sewing machine hinges are what is needed.
The suggestion to first use steel screws to make the threads so that the permanent brass screws escape injury is a great idea.
And... I also like Frank's use of rounded corners. While a little more effort, rounded corners are safer on a sailboat.
Fred, the rounded corners can be tackled a couple of ways and neither should be very difficult. Either by first rounding the table corners before the fiddles are added or after.
The simplest way would be to invert the table and cut from the bottom with any number of saws, including a jig saw or hand coping saw. Both of these cut on the up stroke so as not to splinter. If using a band saw, use a narrow blade if the radius is fairly tight and cut from the top as a band saw blade cuts down.
Then sanding either with a powered or hand sander.
The table is now over a year old, still looks good but we have some issues with it.
It's too big: Version two would not reach so far aft, maybe 3" less. It's difficult toraise and lower: It fits so snuggly to the sides of the bench seats. The legs have loosened up: At first this might not sound so good, but it does make raising and lowering a bit easier.
Fred, I simply cut a small V off each corner and filed them round on a Black and Decker adjustable work table. Since following this thread, I/we have decided not to create a convertible table/V berth extension. With one of us on each side, legs extending aft, we sleep okay for a couple of nights. BTW, gang, what happened to the link on the Format line that enabled us to edit our posts? Now we have to be sure they're "carved in bamboo", to quote the Chinese proverb ("Never say anything that isn't worthy of being carved in bamboo") What a silent world we'd have
Notice: The advice given on this site is based upon individual or quoted experience, yours may differ. The Officers, Staff and members of this site only provide information based upon the concept that anyone utilizing this information does so at their own risk and holds harmless all contributors to this site.