Notice:
The advice given on this site is based upon individual or quoted experience, yours may differ.
The Officers, Staff and members of this site only provide information based upon the concept that anyone utilizing this information does so at their own risk and holds harmless all contributors to this site.
wanted to start by saying thanks to all who have helped me thus far, I will continue to pepper this place with questions!
next up is: instrument R&R
all 3 of my instruments are kaput on the old boat we have, and i want to get some working ones in. at first, i wanted to replace them with matching sized gauges, but after researching it seems this is no longer a practical solution.
then i thought i would plug all 3 holes with some nicely made approx. 5" teak circles, and mount the smaller style 2 1/4" gauges within these. now i think that would look a little cluttered with 3 teak circles on the starboard side there, so i was thinking about mounting a single (triangle-ish?) shaped piece over all three holes, watertight, and then mounting new gauges into that.
any ideas on if that is practical? i read about making a companionway board for instrument mounting but i dont want to add moving pieces if i can help it, rather have everything permanently fixed!
here is a pic with the instrument covers all in place.
Sun Dancer 1980 C25 SR/SK #1992 Hammock Island Marina, Chesapeake Bay.
What were your original gauges, and how do you define Kaput?
I had mine al lrebuilt for a reasonable price by SRMariner, and was very happy with them right up until I did a stress test of the masthead instruments vs a railroad bridge. I won't bore you with the testing methodologies and what not.
Without th einstruments though, I find I am learning to read the wind much better, and not relying on the gauges makes sailing and racing) more enjoyable. I'm not syaing don't replace them, but sayin gthat they may not be as critical as you might think.
In place of the gauges consider mounting a cutting board sized piece of teak/brass/bronze/cutting board and mounting the ships bell or nameplate until you figure out what to do about the gauges. A bell serves 2 great purposes - letting folks know the bar is open, and informing others of your position in a fog.
Just an idea.
To put gauges up I would do about the same thing (and am considering it for my own boat) my biggest reservation is that I don't want more wood to maintain.
<blockquote id="quote"><font size="1" face="Verdana, Arial, Helvetica" id="quote">quote:<hr height="1" noshade id="quote">Why not just glass it in and then use the gel coat match from CD to make it all disappear?<hr height="1" noshade id="quote"></font id="quote"></blockquote id="quote">
I believe that i have the SR marine gauges, they are approx 4" in dia. and after reading here it seems most likely thats what i have. i considered investigating a rebuild but dont think its worth the time/effort for these old analog baby's. depth is the only thing i really want/need here in the Chesapeake, the other stuff isnt as important to me. i might use starboard as it is maintenance free.
glass it in, eh? i didnt think about that. but, ive never done it before and im Scared!!!!!!
Honestly that looks like an ideal location that is easy to work around to try and practice some glassing. so what do i need, and what is the cost, eh? this seems like a lot of work when i could just leave it and make the companionway board mount for my instruments instead....
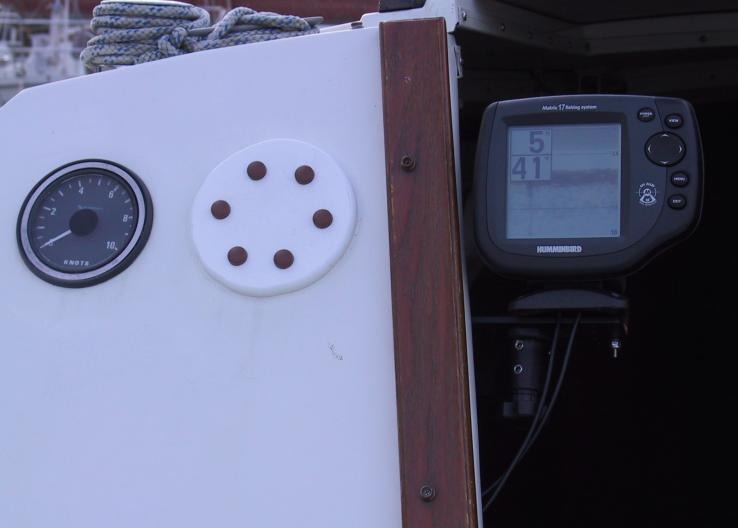
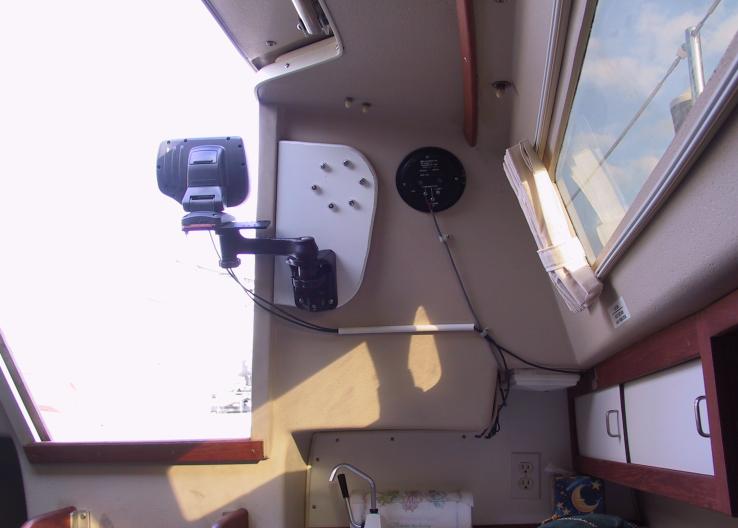
SR Mariner (Long Island, NY) does not sell gages any longer but believe they will still fix them. I believe Signal sells gages that are the same size. Another way to go which is less expensive is to cover the holes with starboard cut with a scroll saw and then bevel the edges. Bolt holes do not have to be drilled thru the companionway. You can drill bolt holes on the inside perimeter of the starboard and then the bolts pass thru the gage hole. From inside the companonway, starboard can then be bolted to the outer starboard piece. When the bolts are tightened, they will hold the starboard in place. You can install on the cabin side starboard a swing mount for a fishfinder. Then use a handheld GPS if you want to know your speed.
The photo below shows how you can use the starboard with it being held by bolts on the inside perimeter of the hole. A RAM Swing mount is used for the fishfinder. The cabin side starboard is contoured to the inner edge of the companionway ensuring no movement from the starboard. The fishfinder transducer is mounted under the VBerth area just using a glob of a toilet bowl wax ring squished onto the hull around the sides of a fishfinder transducer (one that indicates it can be used for inside hull mountings). No real problems wiring the fishfinder to the switch panel. Fishfinder can be had from about $80 and up with many in the $100 - $200 range. My website has more photos and details of the installation.
You could use white Starboard or as many on this site have discovered a white cutting board (Read inexpensive and the same material) These can be found in thinner sizes so the cover won't stick out. Just cut and trim like wood.
I've been happy with this solution, but it still leaves you with holes on the inside (which I covered with a teak binocular holder) to worry with. If I were to do it again, I'd probably do as others have suggested and glass it in and gelcoat it to match. I don't race, so a paddlewheel knot meter isn't a big deal for me and I just use GPS. I have a GPS/Fishfinder combo. I use the sonar on my fishfinder for my depthfinder and the GPS is tied into the DSC of my VHF (my heavens, look at the acronyms!) I also added a small chartplotter (mostly to navigate through skinny water around Kent Narrows) that has been a very nice addition.
<blockquote id="quote"><font size="1" face="Verdana, Arial, Helvetica" id="quote">quote:<hr height="1" noshade id="quote">'d probably do as others have suggested and glass it in and gelcoat it to match.<hr height="1" noshade id="quote"></font id="quote"></blockquote id="quote"> The gelcoat texture on the inside will never come out nice. I would remove the original instruments from the housings, glue in a piece of 1/4" black plexyglass and bore it to fit the new gauges. Keep the same holes. Use the same covers.
The depth meter bit the dust, so I removed the old electronics and replaced them with a 2.5" round digital depth meter that fit perfectly inside the old housing, behind the glass so it's weatherproof. I re-used the housing's rear cover along with the power terminals at the back so that I didn't even have to re-wire the power. I did have to feed the transducer cable through a hole in the rear of the housing, then silicone it in place.
The knot meter & paddle wheel still work fine, but the polarized glass has lost it's polarization. So I can only read the numbers with my sunglasses on. Anybody know where I can get a sheet of clear polarized plastic? I reckon I can just paste it in place with oil.
When the knotmeter dies, I might add a teak cup holder. I was drinking a cup of coffee on Mem Day morning, and with all the stinkpotters whizzin' by in the no wake zone, boy could I have used one!
Oh, and I forgot - if you want your teak to be watertight covering any holes in the bulkhead, make sure that the wood is fastened down with at least four screws or bolts (bolts are better) and use Polysulfide to bed the teak to the bulkhead.
Spread the polysulfide liberally so that when you tighten the bolts down finger tight, you squeeze out a bead of polysulfide all around the teak on the outside, and in the hole on the inside.
Like I said, tighten down the bolts finger tight when you first mount it, then after a week, torque the bolts up. You can trim the polysulfide nicely once it has cured.
You should be able to find a brass barometer or thermometer/hygrometer set at WM to cover the hole on the inside.
wow great ideas! i like mounting the 2.5" instrument pods within the old ones, and maintaining the cover's functionality. wish me luck, when i figure it out i will post some pics!
I covered the area with a large, single piece of Starboard - no maintenance, doesn't look bad, and if my next instruments are a different size I can just replace the starboard.
Notice: The advice given on this site is based upon individual or quoted experience, yours may differ. The Officers, Staff and members of this site only provide information based upon the concept that anyone utilizing this information does so at their own risk and holds harmless all contributors to this site.