Notice:
The advice given on this site is based upon individual or quoted experience, yours may differ.
The Officers, Staff and members of this site only provide information based upon the concept that anyone utilizing this information does so at their own risk and holds harmless all contributors to this site.
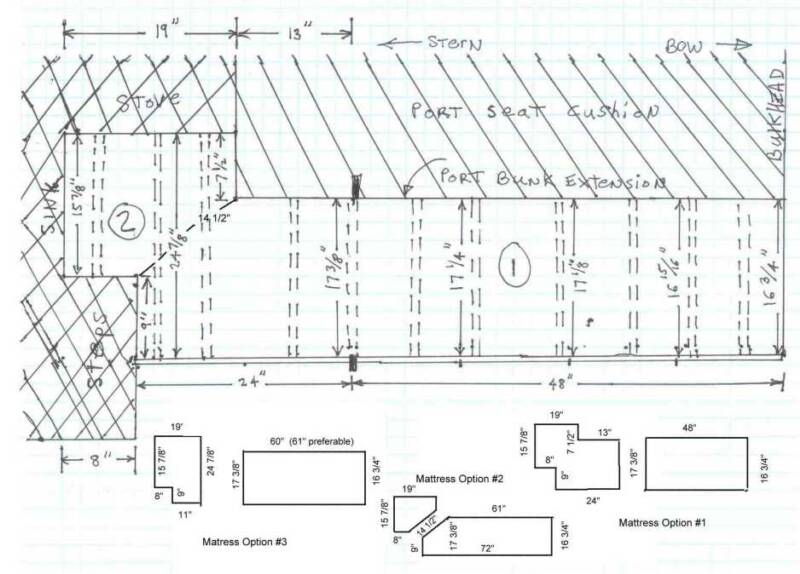
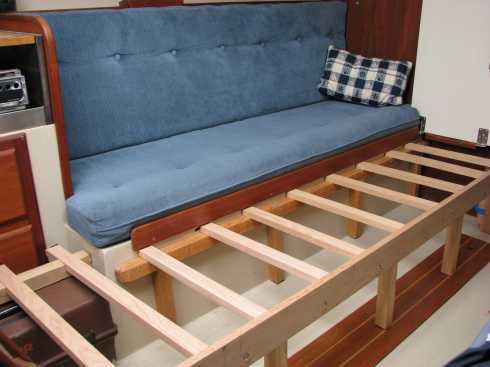
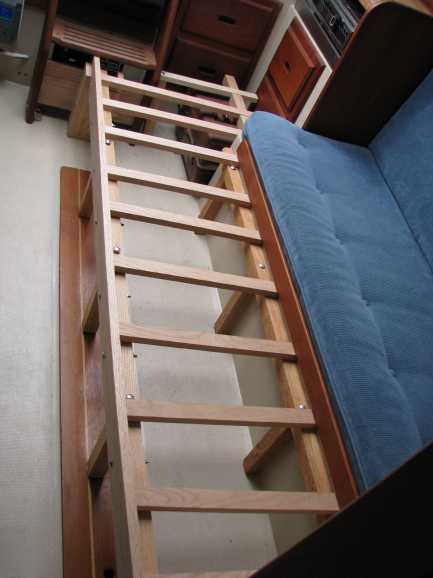
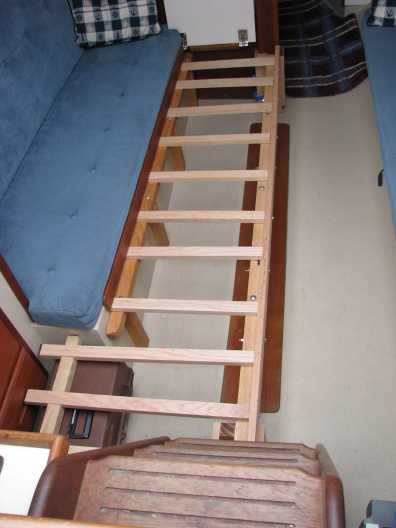
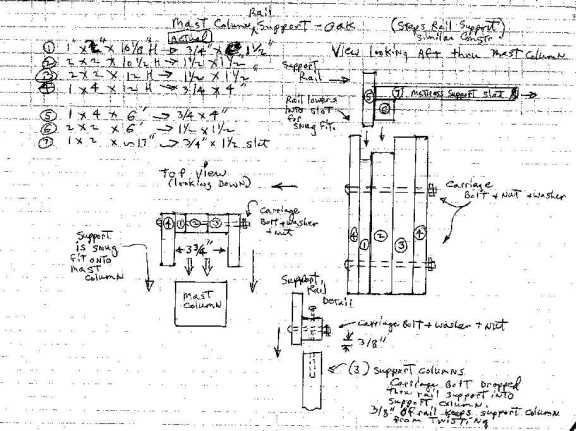
I tried loading the photos(URL) in the test area but I always seem to have glitches with this process - My files are probably too large. Anyway...My supports and slats are completed for the bunk extension. I am now up to the stage when I have to decide the mattress sections - 2 sections but.. I have 3 optional ways of doing this. For reference - See my website...the link titled "Bunk Extension". I have a detailed sketch with the dimensions and 3 optional mattress configurations. (Photos of the supports are on this page as well - So far, only the support structure attached to the port side has a wood finish on it.)
Mattress Options - What's your opinion ? (I may discuss w/mattress mfr as well.)
Option 1: Main Section is 48" long and then a zigzag mattress piece. Benefit - The section joint(s) is at a location unlikely for someone to feel the joining of the 2 sections. Disadvantage - The zigzag piece may not be able to be made that way or the custom design will be expensive with cover zipper, etc. The zig zag piece weak point where it is narrowest is 14 1/2" diagonally across and that may see stress if moved frequently.
Option 2: Main Section is almost full length of 72". The second section is a very small section. Advantage: Main section is almost a standard cut from mattress mfr except for the custom diagonal cut on one end. This makes it almost seamless for entire length. Disadvantage: The main section is harder to store but can be placed full length in the quarterberth area. The short section is also going to be light weight because of size and maybe the section will lift sometimes where the mattresses meet together - Maybe annoying to someone sleeping there...then again...may be a non-problem.
Option 3: Main section is longer than Option 1 and shorter than Option 2. Section 2 is more of a square cut. Advantage: Both sections fairly easy to handle and mostly square/rectangular shapes. If access to drawers under sink are necessary, this option allows easier access since removal of Section 2 will enable the slats to be removed for drawer access with minimal mattress movement. The squarish/rectangular cuts and 5 foot std dimension may be less costly to order. Disadvantage: The main mattress section being 5 foot long means that where the two mattresses join may be a point where the lip may be noticeable to someone sleeping if foot rests in that area.
Any opinions...which option would you pick ? Ohhh...don't say option 4...really do not want to go back to the drawing boards again..
Larry, you posted the link to the page instead of to the images. Here'e the code (If I do it for you then nothing learned.) (img)http://catalina25.homestead.com/IMG_0602a.jpg(/img)
If you copy that code into a post and then replace the () with square braces, then your pic will show up. Just repeat it for the remaining pics.
Paul, Thanks a lot. My batting average for posting photos is about 20% for one reason or another. One would wonder how the heck I ever made a boat website based on my low percentage of success posting photos here. I tried practicing in the test area one more time and using your advice...I had success with the sketch...so let's see what my percentage is posting below 1 sketch and 3 photos ! Hoping for better than 50%.
You and I disagree on what is a deal killer. While keeping the walkway open to the head is an admirable goal I decided that stepping around one corner to get there was the better alternative, especially since that allowed a stowable, quick assembly, full sized bed which uses the back cushion to fill out the mattress. Your bed is beautifully engineered and for me eminently unacceptable. I have to assume that this is a permanent mod,and if that is the case I wonder why you are not cutting a hole in the forward face of the drawer area. Many boats have "feet holes" at the end of settees that add berth length. They usually go into dead space under vanity sinks or the like. The tragedy of the Butler design in having the galley on the long bulkhead side of the boat is the single greatest design flaw and maybe the only major design flaw in our boats and it is what is driving you to your modification. If only there were a way to reconfigure the boat. I do not use the very poor V-berth in my C-25, it is too short and has too little headroom for easy ingress and egress. I would love to move the head there. Then remove the bulkhead between the current head and port settee, allowing a full sized double berth that could be a simple slide out. I have always thought heads belonged in the bow anyway. So I admire your design and execution for solving your perceived problem and getting to your chosen goal but I think my way is the better choice and if I were you I would full stop your design and use my method. Stepping around the corner of the berth has turned out to be trivial and the ease of configuration makes the bed more likely to be stowed anyway. An additional benefit is the table still functions with my bed, I use a custom table most of the time and it is a great "bedside table". I do not want to highjack you thread and turn it into Frank's bed thread, others may come to the same conclusions that drove your decision, so I will only post a link to my '89 pages where readers can find my bed shots. http://gallery.mac.com/fhopper#100045& sel=100
You have put a lot of effort into your project and you do great work.
I've been thinking of taking several short lengths of 2 X 4 or 6 and laying them across the boat from one settee to the other with a 1 X 4 under the ends to raise them above the boards that keep the cushions from sliding off the settee. I would then lay a sheet of 1/4 or 3/8" plywood across the slats and put an inflatible air matress on top. Could almost have a queen size bed! Only drawback would be access to the head but since it would only be setup at night it shouldn't be too much of a problem. The plywood if cut in 24" wide strips could be stored like Frank's and the slats could go under the starbard settee.
I do like Frank's idea also. Might be easier than mine.
Woah ! This is not a permanent mod !!!! The only thing that is sort of permanent is the wood pieces that are flush up against the port fiberglas seat. I have to provide the rest of the details but it all breaks down except......the support rail between the mast and the steps is about 6 feet long, 2" wide and 4" in depth. I plan to rest it in the quarterberth area against the cockpit wall which nothing on my boat occupies that space. In the future, I may string a small support rack in same loaction but to get it off the quarterberth cushion. The supports for the rail all break down. The supports are held in place by 4' and 5" carriage bolts that are just dropped into holes thru the rail and into the supports. The supports against the bulkhead and in-between the steps are not attached but have fit snug and can be easily stored in the storage areas under either seat. The way I made those supports I really need to show you a side view. They are rigid, yet completely portable removable in 2 seconds. The rail from the side view is 1/2"X4" oak. A 1 1/2" X 1 1/2" square oak board is attached to it and is the support for the slats which are velcroed in place against the port seat rail and the removable rail. I will have to load a photo/sketch of the side view of how the rail and square board lock into the supports. The mast support is basically an exact hoseshoe fit on 3 sides of the mast column. It is not permanently mounted.
While the edxtended bunk is easily broken down and stored, I have left it up the past few weeks since it is easy enough to negotiate the steps and also the porta john area. A future mod would be to reduce the size of the table so that I can keep it with permanent swing hinges. I would probably keep a more or less regular size table since the extended bunk can be stored.
Those supports are about the only parts of the extended bunk that required drilling holes thru existing boat - the port side fiberglass below the seat. Those supports are then attached with ...I forget (have to take a look) it is either machine bolts and nuts or small carriage bolts and nuts. I decided to make those supports and rail more or less permanent because sitting on the port side, they in no way interfere or come in contact with your body parts.
We really got sidetracked this year and I didn't get hardly any sailing in. However, next year is going to be a lot different. We bought a queen sized aerobed with a built in pump. I plan on taking 6 to 8 1X4's the length of the width of the cabin. Drill a hole in the end of each, and just lay them out on the settee's. I will also buy some thick towels that I can fold up and use on top of the cushions to keep the boards from wearing on the fabric. When not in use, I will bungee them together using the holes and use the towels when I swim. It's as simple a design as I can come up with until something else comes along. My only concern is the width of the cabin and the length of the air mattress. The mattress is a few inches longer than the total width even after removing the vertical back cushions. However, I don't think it will do anything but make the mattress fit more tightly. My overall goal is to keep to a minimum, additional items that need to be stored.
I think you have the same idea as I did. I was thinking of using 2 X 4's or 2 X 6's though. I'm not sure a 1 X 4 would hold up my fat butt but maybe the distance is short enough that it would work.
There is another option that i have thought of but no need for me to go this way..at least not yet. But if i wanted to really have the king's side bed environment, I could attach another 2"x 2" oak slat support on the starboard side of the removable rail. Then attach another rail and support to the underside of the starboard seat. Then put slats across that side as well and another mattress. But I don't see going this route. Just wanted a slightly larger bunk for my wife. When we slept on the boat, i was in the quarterberth and she was on the starboard seat cushion. She found it to narrow and uncmfortable that way, hence, why I am building this entended bunk.
Your idea of removing the bulkhead in the Vberth to the porta potti area....I would like to do that. But guess it is structural. yet. some boats have a significantly reduced wood support structure in place of a bulkhead. I would be tempted to do that...sort of make cutouts in the existing bulkhead. I don't think i have it in me or my heart to significantly alter that bulkhead but agree the VBerth area is too small and I wind up not using it.
When I had my ODay 23, the VBerth area was a bit longer and that was the sleeping area of choice for two. You then still had the seat cushions for sleeping, though, narrow as is the case on our boats. The ODay 23 had pull-out (slide) stove on one side and a pull-out (slide) sink on the other. Our Cats have the benefit of the cabinet w/drawers and permanent mounted sink and a stove area. But compromised with reduction of length in the VBerth area.
To answer your original question, I would choose Option #3 as it seems to be the most versatile or go with Option #4. Option #4 would be similar to #1 except make the mattress a full length (72") rectangle (take it all the way to the step) and just use a small "L" shaped insert to fill in around the foot and side next to the drawers. That would eliminate the seam issue for the most part and the mattress would be easier to manufacture.
Do you know what the measurement is from one side of the boat to the other at the seat level of the settee's?
Don't know if this applies or not Larry, but if you can, have a look at an Islander 28. The port settee has a piano hinge along the front of the settee and a piece folds out into the walkway creating a double wide for a matress. I can't find a single photo of that on the web. Dan
Gary - Thanks loads for picking Option #4....that is exactly why I mentioned not to pick an Option #4....I knew it would be too tempting to do so ! Ha Ha Okay...you also picked Option #3. I decided to go that route. I am cutting up the Plastazote today/tonight. It was threatening rain all day and finally did so. So we went to the East and West Wing of the Smithsonian Art Museum in DC today. Now that we are back....cutting the Plastazote in about 1/2 hour from now. Then will fit in on the bunk frame tomorrow and if okay, will then order the mattress to same dimensions. Plan on going sailing tomorrow as well - It's going to be sunny and in the mid 40s.
Paul/Dan,
That's a nice extended bunk looking at the photo. I will be scouring the websites for other arrangements (ie Islander 28 ?). Mainly because I always wanted to shorten the table and put it on permanent swing hinges like I had on my ODay 23. The present arrangement whereby you lift it up and maneuver it into the table supports on the bulkhead...is cumbersome.
My bunk project can easily be stored but I may make a rack for it under the quarterberth area near the cockpit wall. A rack will keep it off the quarterberth cushion and facilitate access to the battery compartment. So...that will be a future project. I want to wait till I get the new mattress (prefer new to using one of the existing cushions) in place on the new bunk extension before I see how it matches with (and firmness) with the existing seat cushion. I probably will replace/supplement the foam in the existing seat cushion to provide more firmness and match the new mattress. But I will take it one step at a time.
By the way.....the buttons on the existing seat cushion seem to go thru the foam to the button on the other side. How are those buttons attached ? Can they be detached from each other if I wanted to replace the foam with a firmer foam piece ? Anyone know ?
Why not just have the mattress made to fit the whole area and skip modifying the existing cushion. You'd then have just one piece to mess with. The could actually make the mattress in two pieces but be connected with a vinyl or leather hinge so you could easily fold it in half and store in the quarterberth.
I did not want to remove the original wood side piece that keeps the seat cushion in place. It is a lip that sticks up above the fiberglas seat. But you are right, if that piece of teak is removed, then one full size mattress has benefits. But most times, I am not going to be using an extended bunk. I mostly day sail. I like the idea of going out for overnighters, but we probably will not go on many of them since my wife does not share same level of enthusiasm for boating as I do. One overnighter a year will probably be enough ...if I am lucky, maybe two and perhaps one or so by myself. Since I day sail most times, a full width mattress is great when being used but when it is not, it is then harder to store...may still fit in the quarterberth area but more cumbersome.
But I am going on my boat tomorrow. I will look things over....give some more thought to the mattress options.
I understand what you're saying. I was thinking that the "hinge" could be constructed so the when the mattress is unfolded the open side of the hinge would face down giving the top surface of the mattress a smooth seam all the way across the mattress. If designed this way the open side of the hinge would fit over the teak lip that sticks up. This would have the added benefit of keeping the mattress from moving around.
Just a thought if anyone else decides to follow your path.
I like the idea of the piano hinge. I would think you could remove the teak rail that holds in the seat cushion. Then attach the teak rail to the top of the piece of plywood. when folded closed, this would look just like it does today, then when folded open the teak rail would swing under leaving a flat surface for the cushions. The only thing I will need the engineer is some type of support for the other side.
Okay, thought about this right after posting it. How about not doing legs at all. How about some type of rigging wires holding up the other side of the bunk from either the ceiling or over to supports near the outside wall. Might look pretty cool.
Notice: The advice given on this site is based upon individual or quoted experience, yours may differ. The Officers, Staff and members of this site only provide information based upon the concept that anyone utilizing this information does so at their own risk and holds harmless all contributors to this site.