Notice:
The advice given on this site is based upon individual or quoted experience, yours may differ.
The Officers, Staff and members of this site only provide information based upon the concept that anyone utilizing this information does so at their own risk and holds harmless all contributors to this site.
I was going to suggest using a heat gun. They can get the temps p pretty high but safer than a torch. However, it looks like you are past that point...hopefully mechanic can work on it and get it back to you real soon.
Off Topic:
Scott - Your comment regarding "If it ain't broke, don't fix it" applying to lightbulbs....Well, sometimes even if it is broke, don't fix it may also apply to lightbulbs !!
I recall back in 1985, I was working as part of an engineering team involved with preparing piping re-inspection packages for Commonwealth Edison's Braidwood Nuclear Power Plant as part of an effort to help gain NRC licensing approval for initial fuel loading and startup. For 9 months, I rented an apartment in the town of Morris, IL which is about 70 miles SW of Chicago. Just a few days before I was leaving this assignment and heading home, one of the bulbs in the hanging light over the dinette table burnt out. So, I proceeded to replace the burnt out bulb with a replacement I purchased. As I unscrewed the burnt out bulb, the lightbulb socket assembly broke off the lighting fixture. (This was an old lighting fixture !) So, I left a note for the owner explaining how the old fixture broke. After I returned home, a few weeks later I received my rental security back from the owner, minus the cost of a whole new lighting fixture ! I think that lightbulb change-out cost me between $60-$100 of the $285 security deposit !
There are many things I can do myself but sometimes this applies:
Well, What can I say, That was written on top of an instructor's blackboard when I took some Airframe/Power plant courses way back when and Its just one of those things that stays with you through the years.
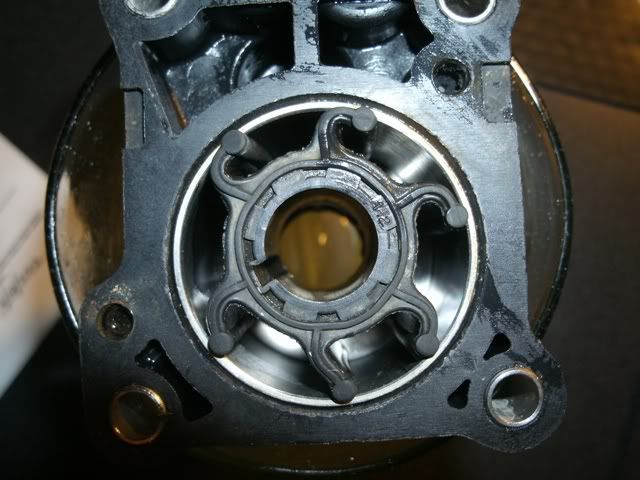
I went ahead and dropped the lower unit on my crippled outboard tonight. I wanted to confirm my suspicion that the upper shift rod was broken (it is) and also save a few bucks on shop hours by doing the impeller myself. It was very straightforward getting into the impeller. I took careful note of which way the impeller turns, and it wasn't unanimous - it was a "4-2 vote" :
<center></center>
It had me wondering whether the impeller was just temporarily dislodged while I was removing it, or whether it was installed improperly with two of the vanes facing the wrong direction. After popping out the impeller, the vanes are retaining their opposing direction, so I suspect that it was installed improperly to begin with. This might explain the intermittent stops I was seeing in the pee hole.
The vane itself is in pretty good shape - no tears or abrasions, and it could be re-shaped to go in properly. But I'm going to put in the new one anyway, and keep this one as an emergency spare.
I'm also going to try to drill out the broken threads in the linkage nut. At $40 for a replacement, it's worth a few minutes of my time to try.
That certainly is weird ! It had to have been installed incorrectly. But you would think whoever installed it would have at least had all the vanes in the wrong direction, not 4-2 !!
Anyway, the shop manual shows it correctly but you have to orient yourself to the way they depict the views of the impeller.
Also, there does not seem to be any residual grease inside the housing. I would have thought there would be some at least hanging on the outside or way inside.
That certainly is weird ! It had to have been installed incorrectly. But you would think whoever installed it would have at least had all the vanes in the wrong direction, not 4-2 !!
Anyway, the shop manual shows it correctly but you have to orient yourself to the way they depict the views of the impeller.
Also, there does not seem to be any residual grease inside the housing. I would have thought there would be some at least hanging on the outside or way inside. <hr height="1" noshade id="quote"></font id="quote"></blockquote id="quote"> My shop manual calls for coating the interior liner with oil, not grease. When I installed the new one, I applied some 30w oil with a swab.
I had no problem getting the orientation right. I referred to the shop manual, and also verified by turning the propeller backwards (since it's in reverse gear) to observe the shaft rotation. With the new impeller in, it rotates very freely in that direction. I was careful not to rotate it the other direction (didn't want to reverse the vanes), but I did move it a tiny bit and confirmed that the resistance is greater in the other direction.
I think it's pretty easy to get the vanes in different directions if you push it straight in without any rotation. My shop manual is pretty explicit about rotating counter clockwise while inserting it. That rotation is what guarantees the vanes are all pointing in the same direction.
So late Wednesday night, I installed the impeller, thermostat was replaced and I ran the engine briefly - not a drop of water. I decided to pack it in after dark. First thing Thursday morning I rechecked the impeller and it looked OK so reckoned that the water tube feed probably did not align properly. In the AM, I straightened things out and the water streamed out vigorously. My splash date was saved. I saw the yard boss on the way out who told me I'd be splashed on Thursday afternoon. She's been in the water for a day and a half and no leaks. I'm ready to motor down the river and back to Milford Harbor on Saturday AM
At least on the Honda 9.9, it is possible to not align the water tube as you re-install. When putting the extension adapter and gear case back on, the water tube that is hanging down needs to go into the rubber hose that is fitted on the lower unit. If the water tube is not placed inside the rubber hose during installation, well that would explain no water coming out. When the tube is in the water hose, then the impeller pums the water up the water hose and up the water tube for enginecooling before it squirts out the lower half of the engine casing.
Larry, precisely what happened - tube missed the connexion Second time around, I made sure to wiggle the tube slightly to starboard of center and next thing I knew it was working. With a renewed engine, I set out downriver from Shelton this morning to my summer slip. Made it past both drawbridges in record time and got to the dock in Milford in about 3 hours. Will wash the sails tomorrow and my summer season in CT will have begun! Woo-Hoo!
<blockquote id="quote"><font size="1" face="Verdana, Arial, Helvetica" id="quote">quote:<hr height="1" noshade id="quote"><i>Originally posted by RhythmDoctor</i> <br />I went ahead and dropped the lower unit on my crippled outboard tonight. I wanted to confirm my suspicion that the upper shift rod was broken (it is) and also save a few bucks on shop hours by doing the impeller myself. It was very straightforward getting into the impeller. I took careful note of which way the impeller turns, and it wasn't unanimous - it was a "4-2 vote" :
<center></center>
It had me wondering whether the impeller was just temporarily dislodged while I was removing it, or whether it was installed improperly with two of the vanes facing the wrong direction. After popping out the impeller, the vanes are retaining their opposing direction, so I suspect that it was installed improperly to begin with...<hr height="1" noshade id="quote"></font id="quote"></blockquote id="quote"> This afternoon it occurred to me that the inversion of the two vanes may have been caused by my over-pressuring the water hose during my testing of the motor. I suspect that the impeller was not installed improperly. It's a good warning no to overdo it with the water when using Honda's little attachment for supplying city water to the motor.
Also, upon closer inspection, a few of the vanes were starting to crack, so I have no regrets about replacing the impeller at this time.
I was going to suggest that. You can flip the vanes if you use the screw in attachment and crank up the water with the engine still off. It's common but usually they will flip back soon as you start the engine. I have that attachment but have never used it preferring muffs or a garbage can. The impeller is not a paddle wheel but rather each chamber is a small pump. It sits in the cup off center so when it spins it compresses a vane on one side then as it continues to rotate the vane expands making that chamber larger creating suction. If the vanes become stiff over time this suction effect becomes less and less. Your water pressure flipped the vanes that were on the looser side of the cup.
Is there a way to use a funnel, a short segment of hose, the flush fitting and a jug of fresh water instead of a garden hose and faucet to flush out the system? Or do you need a certain amount of PSI to make the water push the valve open? Might be an easy way to rinse it out if you could get it to work. Maybe one of those 12VDC bilge pumps with the right kind of plumbing would do it?
<blockquote id="quote"><font size="1" face="Verdana, Arial, Helvetica" id="quote">quote:<hr height="1" noshade id="quote"><i>Originally posted by JimGo</i> <br />Average in this area seems to be about $100/hr, Rick. Good luck! <hr height="1" noshade id="quote"></font id="quote"></blockquote id="quote"> Overall, I had great luck. Hilton Marine finished the job yesterday (two days early). Their guy figured out a way to remove the pin holding the shift rod without removing the power head, so it was 1.5 hours shop time instead of the 4 hour initial guesstimate. Shop rate was $85/hour, a little lower than Jim's average.
Overall, the whole thing didn't cost that much more than if they had done the impeller replacement for me, so the sting of botching my DIY job was a lot less than I feared.
I continue to be impressed with that little store in Elsmere. If you need a walk-in Honda dealer and you live in the Wilmington-Philadelphia area, I'd recommend Hilton Marine.
That's great news. Also good you passed along the name of a shop you consider outstanding. So many times only negative experiences get passed along it gives an impression that it is impossible to receive good service. I would urge anyone who has positive comments about a store, dealer or service provider who continually provides great service to pass it along. Those are the type of businesses that deserve our continuing support.
Opened up my 7.5 HP Honda because I thought the impeller needed replacing. Impeller is fine. When i pour water in the top of the outlet of the pump the top of the drive shaft in the pump fills with water. I can see a very small hole in the plastic housing above the impeller cup. Anyone know if it is supposed to be there. I don't want to put it all back together if that housing needs to be replaced. The last time I ran the motor it did not want to run. I brought the motor home to see why it would not run. Of ocurse it starts and runs fine in my bucket of water but no outflow of water. Thanks.
David I don't know exactly what the problem may be, but once I replaced my impeller, I had still not aligned the water tube that connects the impeller pump to the engine head. I had no water flowing up to the engine block. I had to realign it. I checked the repair manual and also looked at the exploded view of the system on www.iboats.com. If you check the illustrations versus your engine you may see something wrong. If you have a photo of your engine's water pump, the group may be able to help. Good luck. Edit: btw don't run your engine if there's no water running thru it.
I have the unit opened up. If you pour water in the water outlet on the pump housing it fills up the space in the housing above the drive shaft. You have to shine a flashlight in the housing to see the hole. It looks like a weep hole. I can't imagine why it would be there.I think it would allow the bottom of my lower unit to be full of water as long as the motor was in the water.
Hauled the boat out Monday for bottom job and engine service, everything was going fine until I tried to take the lower unit off to replace the impeller. Looks like corrosion is the problem, just can't get the lower unit to break loose. All 5 nuts are off the studs and shift linkage disconnected. The local Honda outboard shop didn't have any good advice other than keep pounding on it and soak it in something to break the corrosion loose. Local Honda outboard store wanted $70 for the impeller rebuild kit, I chose to get only the impeller, can't imagine the impeller housing needing replacement also.
From those who have replaced the impeller, should I get the entire kit or will just the impeller suffice? I guess I need to get the lower unit off to look at it to be sure. It's a 2006 8hp, only 2 years in a salt environment and flushed with fresh water after each use.
You can use a rubber mallet to gently coax the set-pins loose. They basically hold the bottom unit in alignment when you realign the bolts and are prone to freezing up. Don't try prying the top and bottom apart with a screwdriver or paint-scraper. You'll only crack the housing. Careful what you whack. Jiggle, coax, yank, twist - be persistent. These are your best bets for separating the housings.
The entire housing is aluminum so be careful of smacking it too much. You might try applying heat around the seam between the surfaces but since they are both aluminum that may not help much. When I replaced mine it had been used in a saltwater environment for over ten years and it came apart easily. I seem to remember four nuts though, not three, but it has been quite a while. There are two fiber gaskets in the kit which may be reusable - or not. The bearing in the bottom case under my impeller felt rough when rotated so I replaced it also. Make sure you check it. The kit does not include that bearing. It might be worth your while to dismantle, appraise and then order parts.
Notice: The advice given on this site is based upon individual or quoted experience, yours may differ. The Officers, Staff and members of this site only provide information based upon the concept that anyone utilizing this information does so at their own risk and holds harmless all contributors to this site.